Introduction
Connect2 Mobile is an application that connects with eMaint to provide an online and offline experience where a user can perform basic work management without the need of constant WiFi connection. (test)
The app provides the following features:
- Ability to view all Work Orders assigned to a technician
- Search for Assets and create Work Orders
- Ability to capture photos on a work order
- Ability to complete a list of Work Procedures (Pass, Fail, or Urgent Repair)
- Create follow up Work Orders from Work Procedures (Urgent Repairs)
- Sign On and Off of Work Orders
- Create Labor and Parts Charges on Work Orders
- Complete Assigned Work Orders
- Managing Work Order Requests (Add, View, Approve, and Reject)
- Integrated barcode scanning
- Offline functionality Syncs information once they regain WiFi
Logging into Connect2 Mobile
Upon opening Connect2 Mobile, the user will be prompted to enter in their user credentials. Your login credentials will be the same as your credentials in eMaint. If it is the first time the user has logged in using Connect2 Mobile, they will need to click on the “Settings” button first to connect their app to the correct server.
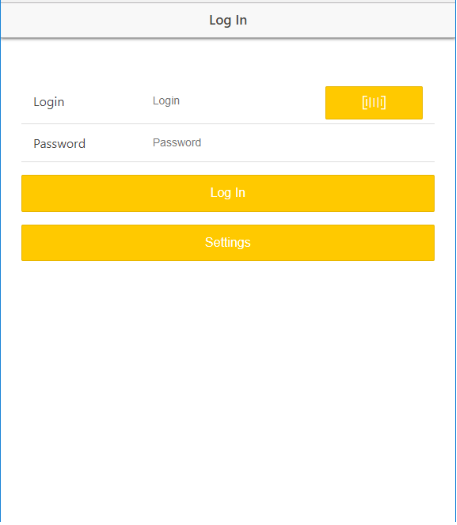

Connect2 Mobile Login Page
An eMaint representative will provide you with the “Server” address you need to fill into the application to be able to connect to Connect2 Mobile. The same value can be used for all users of the account.
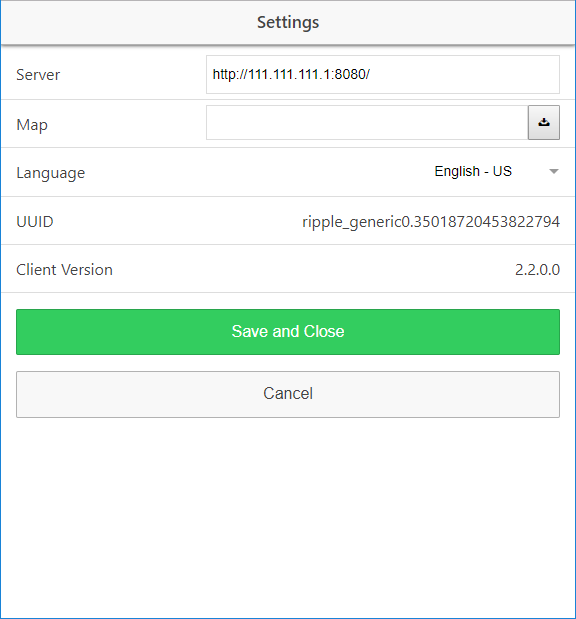
Connect2 Mobile Login Setting Page

When logging in for the first time, you will want to be online to allow a proper authentication to occur for the device logging in and to allow eMaint to update the most up to date data on the application. Once you have logged in successfully and are brought to the main menu, you can begin your work offline as needed.
Connect Mobile Home Page / W/O List
Upon logging into the Connect2 Mobile app, the user will be brought to the W/O ListView. By default the user will be viewing all open work orders that they are assigned to, sorted by priority.
Each WO will have a color indicator along the left side to indicate the current technician’s sign on status, as pictured below. The various status’ are as follows:
- Assigned (Yellow) - Indicated a new job that a technician has not yet taken action against
- Started (Green) - Indicates a job that a technician is currently signed onto
- Paused (Red) - Indicates that a technician has signed onto the job, then paused their time.
Note - The Connect2 Mobile app only references the “Assignments” related table to a work order for the list view. The “assign to” field on the work order form is ignored.
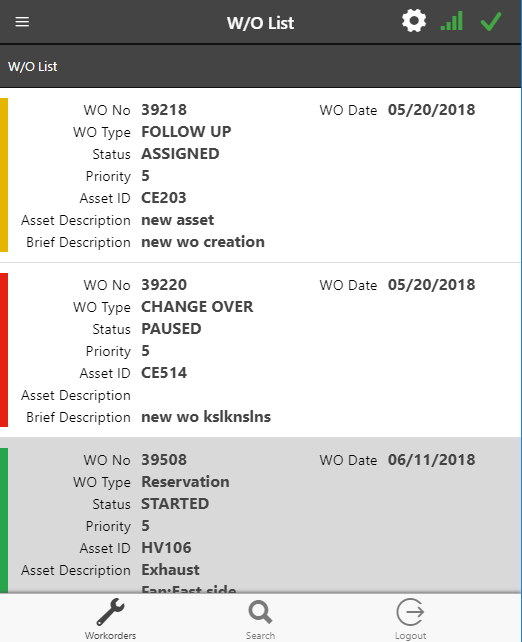

Connect2 Mobile Home Page
Searching For Assets
To begin the search for an asset, tap the “Search” button along the bottom app tray.

Connect2 Mobile Home Page

From this screen a user can search for an asset using the Asset ID or the Asset Description. Start by typing a value into the asset id or description field.
Once the user presses the “Search” button, matching records will be listed below the “Asset List” label. Now a user can tap on a line with an asset to see additional details of the asset or to create a work order.
Note - Each search box utilizes the “contains” operator so technicians do not need to know the entire Asset ID or Description to locate the proper record.
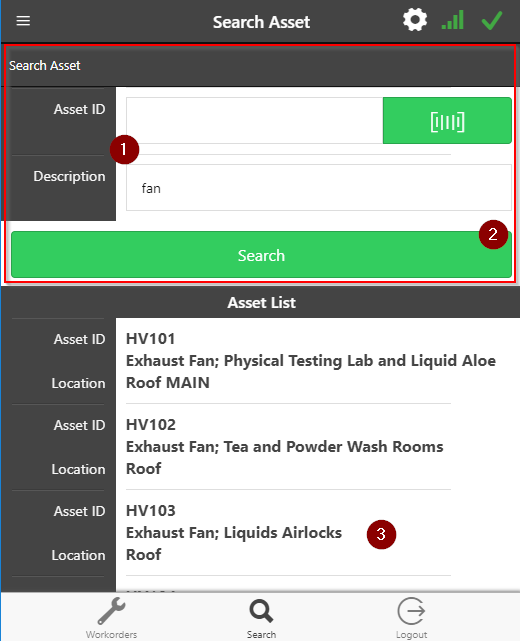
Asset search with results
Viewing Assets
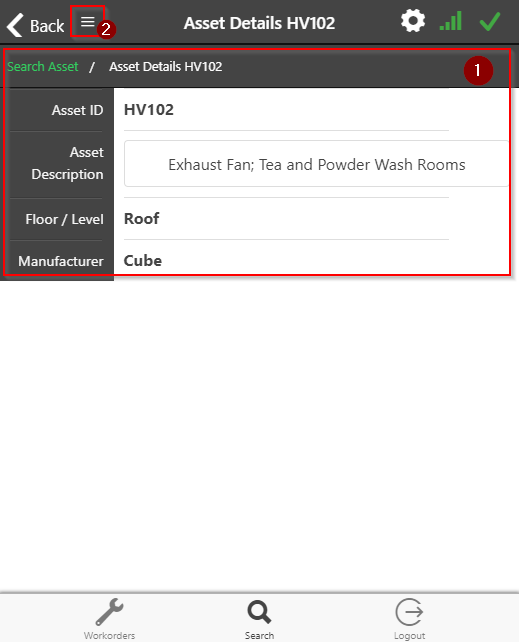
From an asset in Connect2Mobile, you are able to view basic information related to the asset, view the Work Order History, create a new Work Order, or view Spare parts.
The Asset Details page will show you a list of pre-configured default fields for the asset including but not limited to Asset ID, Asset Description, Floor/Level, and Manufacturer.
Note - If a default asset field is not populated for the asset, that field will not render on the asset page in Connect2 Mobile.

Asset Details Page
Asset Menu
The Asset menu is similar to the “Actions” drop-down for an asset in X4. To expand the menu, tap the triple horizontal bar icon. Below is a short explanation of each menu option:
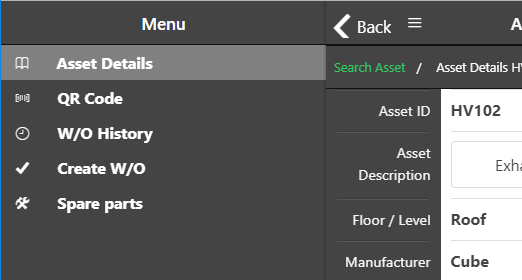

Asset Menu Expanded
Asset Details - Collapses the menu
QR Code - Generates a QR Code
W/O History - Displays a list of historical work for the current asset in a list format
Create W/O - Allows a user to create a new work order for the current asset
Spare Parts - Displays a list of related parts to the current asset in a list format
Creating a Work Order
If a user is currently viewing an Asset, Connect2 Mobile gives them the opportunity to create a new work order for that asset from the asset menu. To get started open an asset, expand the menu, and select “Create W/O”. You will then be taken to the blank form to create a new work order, as pictured below.
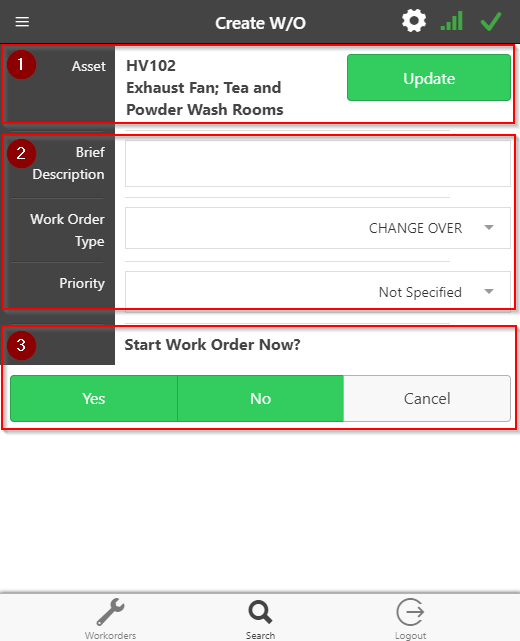

Breakdown of "Create W/O Form
From here there are 3 sections that a user can populate. Asset information can be viewed or modified in section 1. The Brief Description, WO Type, and Priority Level of the job can be set in section 2. Lastly, the user can choose to “Start” the Work Order in section 3.
Note - When a user starts a work order they will create an assignment record for themselves and automatically signed onto the job. If you wish to simply create the work order without taking ownership, select “No” in section 3.
Uploading Photos to Work Orders
Once a user has created a work order the Connect2Mobile app allows them to upload image(s) to the job from their camera or photo gallery.
To get started open a work order and tap the menu button (hamburger icon) then tap "Upload Picture". The next screen allows the user to select an existing image or a take a new one. Tapping "Browse" will bring the user to their photo gallery while tapping "Take Photo" brings a user to their camera. Once an image is either captured or selected, the user can optionally provide the image a name, description, and choose its location in document storage. Tapping "Upload Picture" will save the picture.
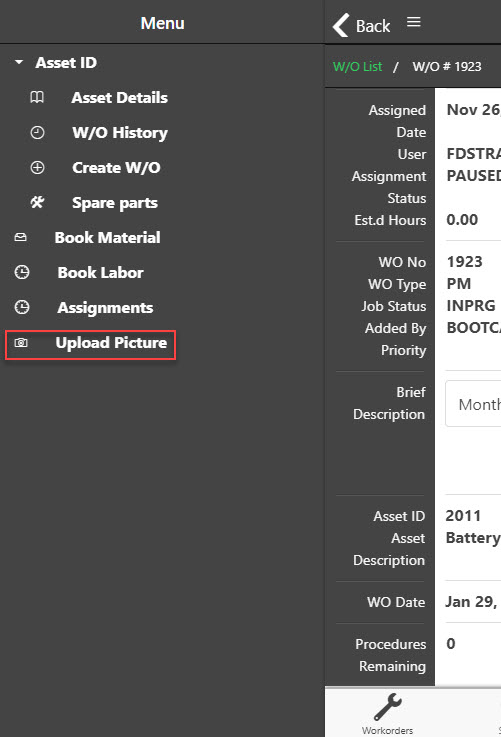
Work Order Menu
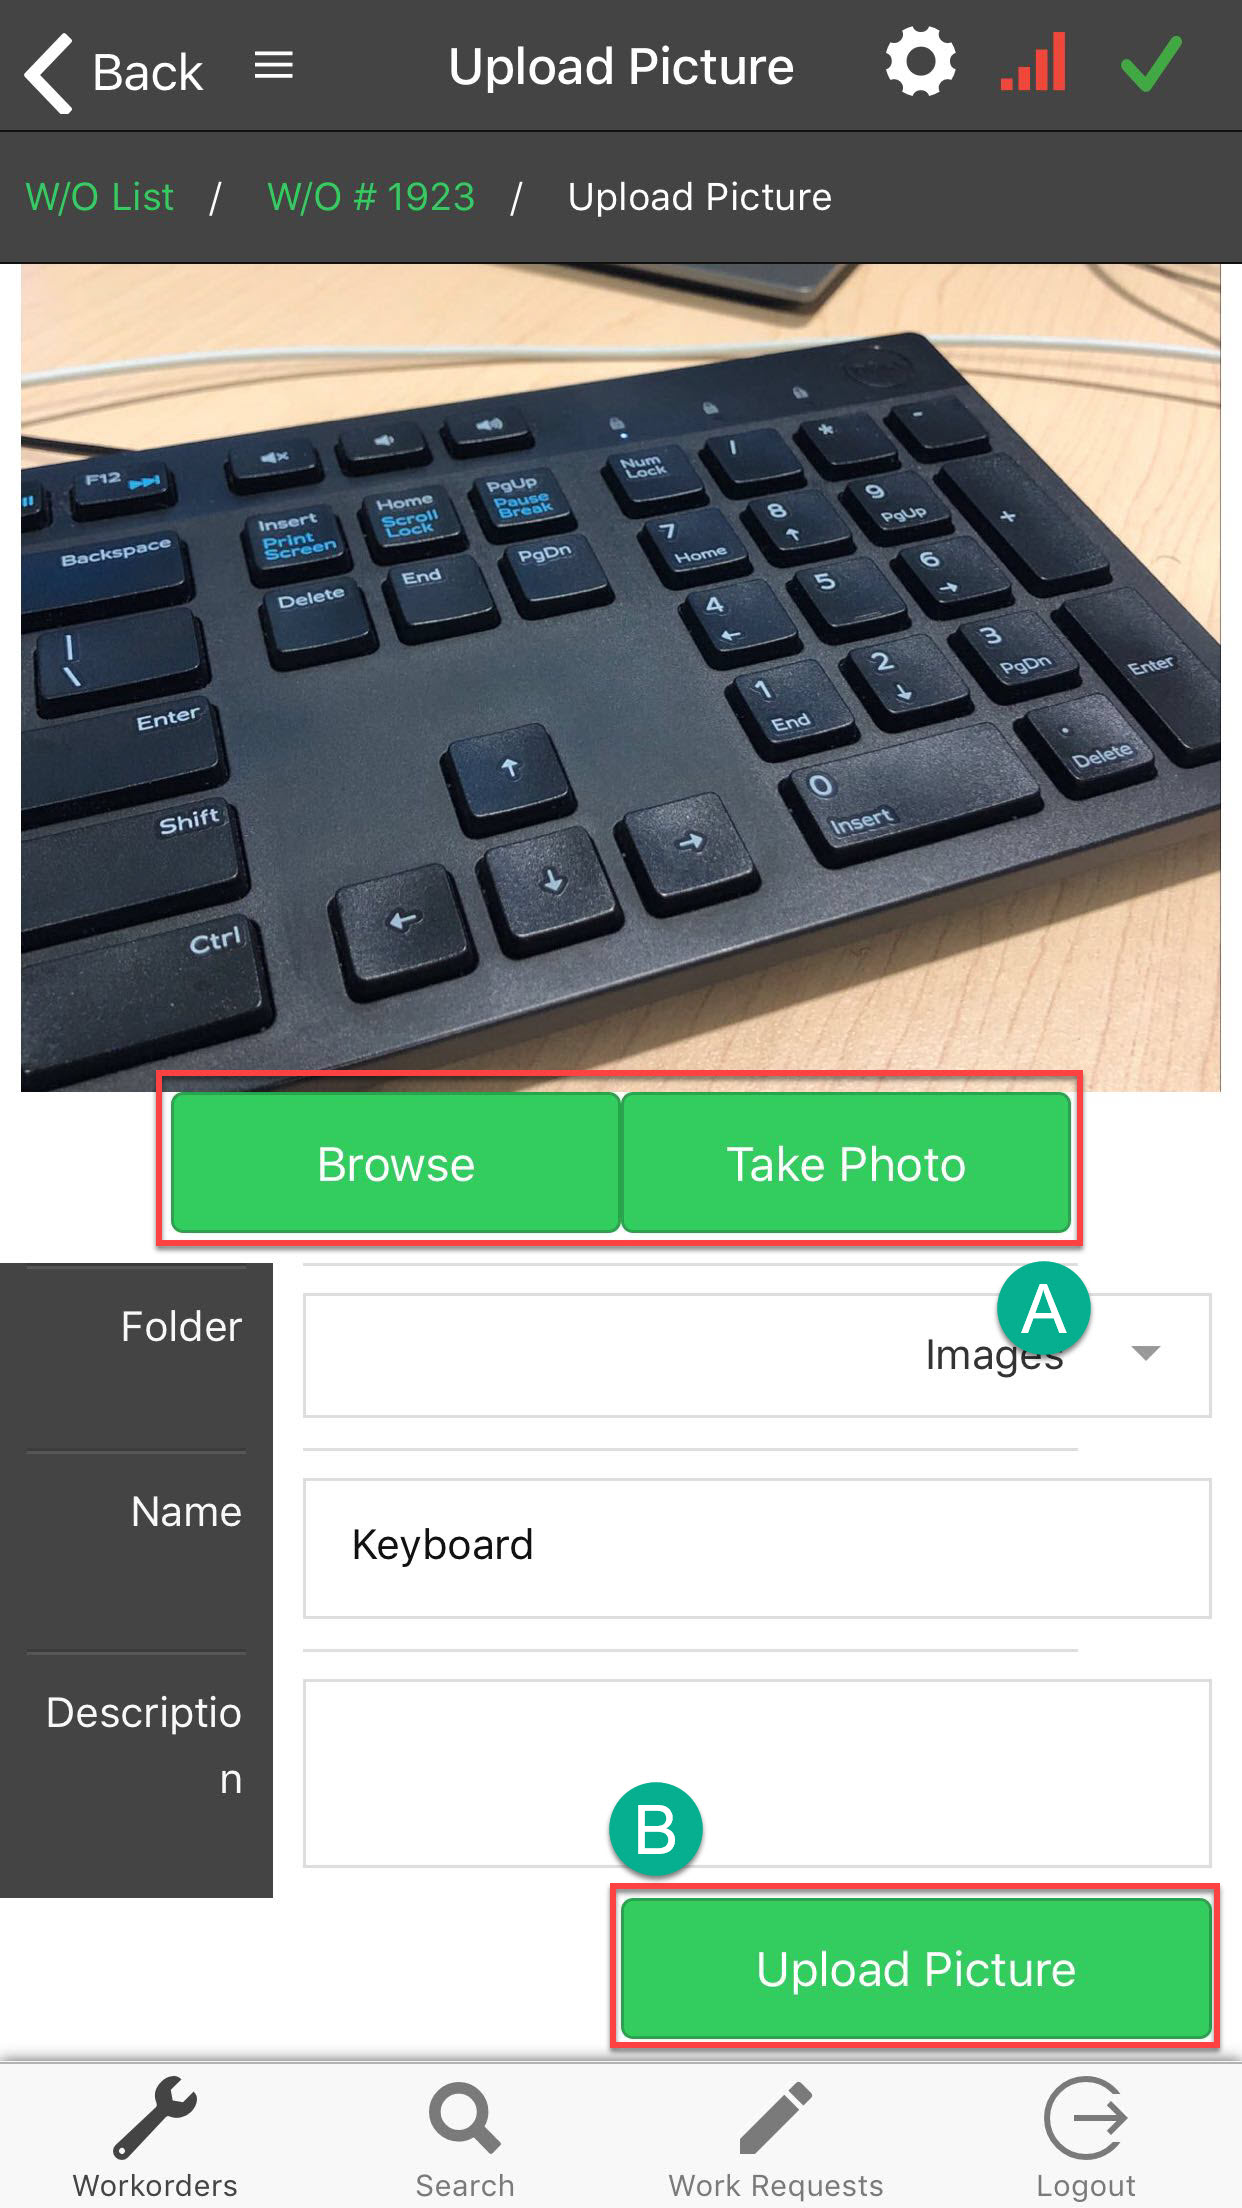
Upload Picture Screen
Note - Each photo uploaded to the work order is stored in the "WO Documents" related table. There is no limit to the number of photos that can be uploaded.
Viewing Work Procedures
Connect2 Mobile allows users to complete work procedures that were attached to the jobs. To access the work procedures for a job the user must open the Work Order and select “Work Procedures”. From the main Work Order the user will see a count of total and remaining procedures for the job.
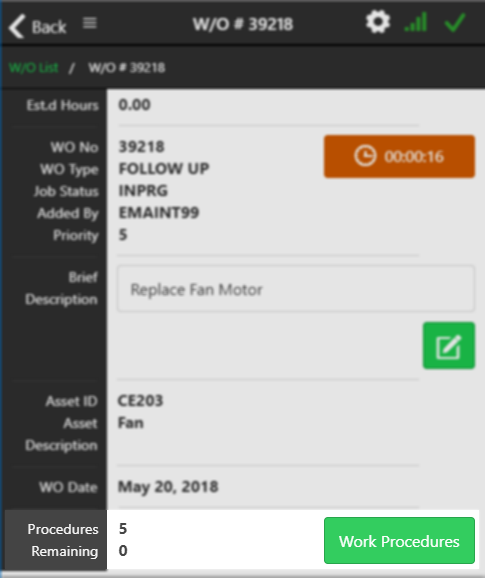
Work Procedures button on work order form.
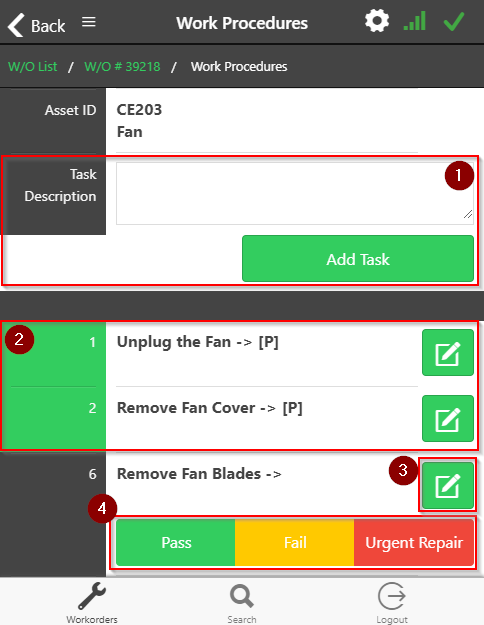
Work Order Procedures screen.
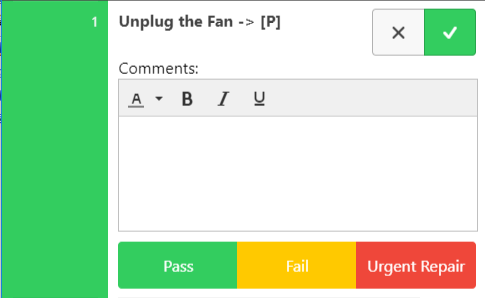
Dialog box for adding a comment to an existing procedure.
On the Work Order Procedures screen, pictured above, the user can add additional procedures, view existing procedures, add comments to specific procedures, or complete them.
Adding a new procedure - Type the Task Description in the text area and select “Add Task” (step 1).
Viewing existing procedures - Any existing procedure will be listed below in section 2 .
Adding a comment - To add a comment to an existing procedure, tap the memo icon alongside any procedure to reveal the memo box. Don’t forget to tap the green checkbox to save changes.
Completing a procedure - A procedure can be passed or failed from section 4.
Completing Work Procedures
From Connect2 mobile a user can pass or fail individual steps. Based on the status that a user selects the system may create a work order immediately or once the current job is closed.
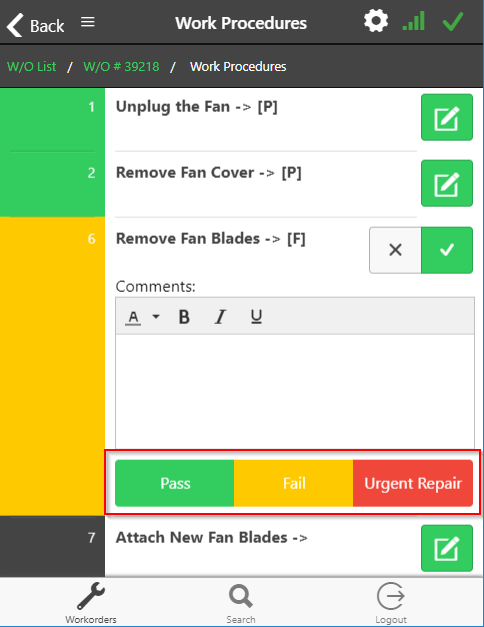

Expanded Work Procedures
From the list of Work Procedures, a user can tap on a single line to reveal their various status options: Pass, Fail, or Urgent Repair. A breakdown of the options is below.
Pass - Marks the procedure as passed. No further action required.
Fail - Marks the procedure as failed. No further action required.
Urgent Repair - Marks the procedure as failed and immediately creates a new work order.
Note - If a procedure is marked as “Urgent Repair” the user will immediately be taken to the “Create W/O” screen to create the temporary follow up work order. The work order will be assigned a work order # once the device is connected to a valid internet connection.
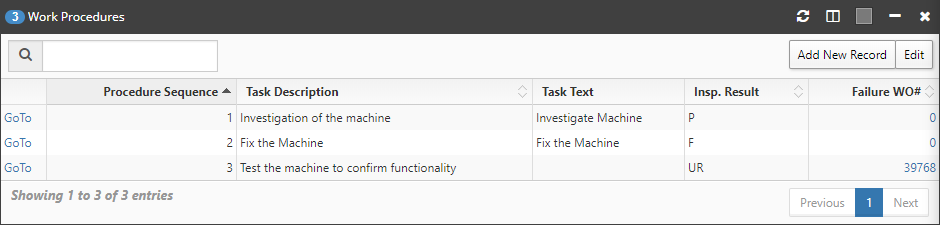

Insp. Result values for Pass, Fail, and Urgent Repair
Signing On/Off Work Orders
Connect2 Mobile allows users to easily sign on/off of jobs and view the status of those jobs from a central list. To get started a user should navigate to the Work Orders list view by tapping the “Workorders” icon in the bottom app tray.
From this list view, a user can tap on a work order to view its details or manage their sign on.
To sign onto the job tap the clock icon on the work order, as pictured below. Signing off of the work order follows the exact procedure. Once a user is signed off, a labor charge is automatically created for their time.
Note - A sign on for a user that is under 1 minute in duration will be discarded.
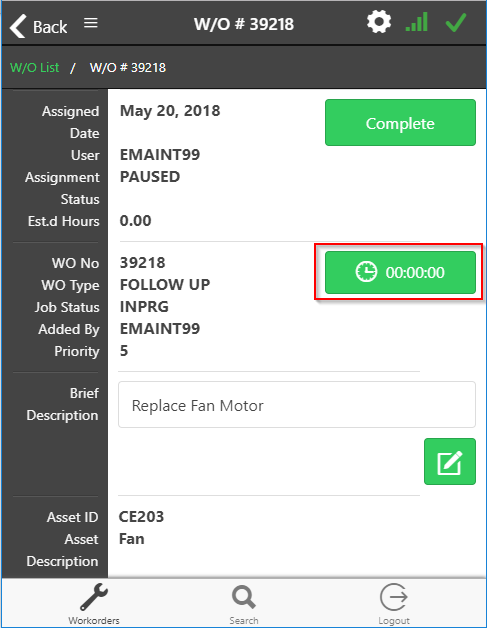

Paused Work Order
Adding Charges to a Job
Users have the ability to add labor or part charges directly from work orders in Connect2 Mobile. In either case the user must first open the work order and expand the menu. To expand the menu tap the triple bar icon, as pictured below (step 1). Below is a short explanation of each menu option:
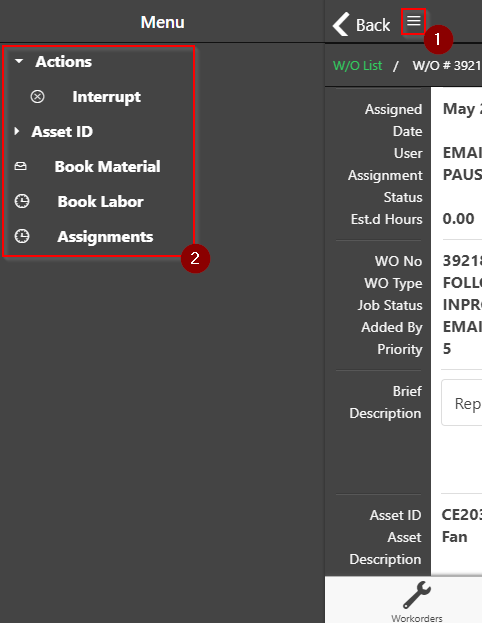

Work Order Menu Expanded
Interrupt - Updates the Assignment Status to Interrupt and prevents the user from modifying the work order.*
Book Material - Allows a user to create Part Charges
Book Labor - Allows a user to create Labor Charges
Assignments - Allows the user to view all assignment records in a list view format
Note - to allow a tech to sign onto a job they’ve interrupted, you must create a new assignment record for them.
Adding Parts to a Job
From the Book Material page in Connect2 mobile users can view existing part charges or add new part charges from inventory, reserved parts, or from items previously related to the main asset of the work order. See below for a breakdown of the various sections on the screen with their intended functions:
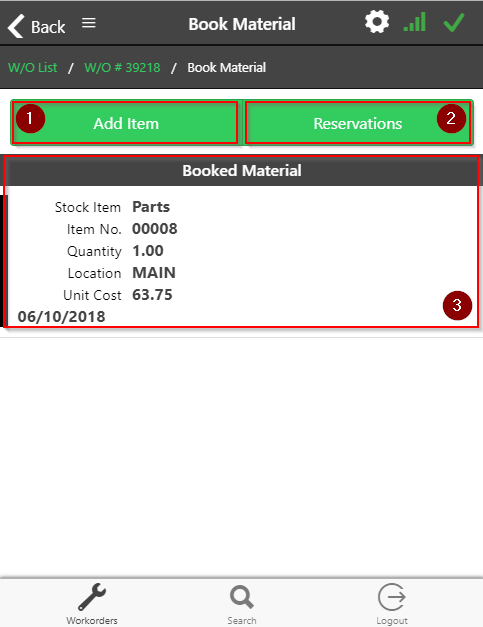

Book Material Screen
Book Material Screen:
Section 1 Add Item - Allow users to add a new part from Inventory or from related parts to the main asset of the work order
Section 2Reservation- Allows users to add new part charges based on items already set aside in the Parts Requirement related table.
Section 3Booked Material- Displays a list of current part charges to the current job with information about the item, qty, and location.
Create a Part Charge
To create a Part Charge select “Add Item”, as pictured below. On the next page, the user will be presented with a list of items in the “Related Parts” related table for the asset to the work order and the option to add a new part from Inventory (see step 2).
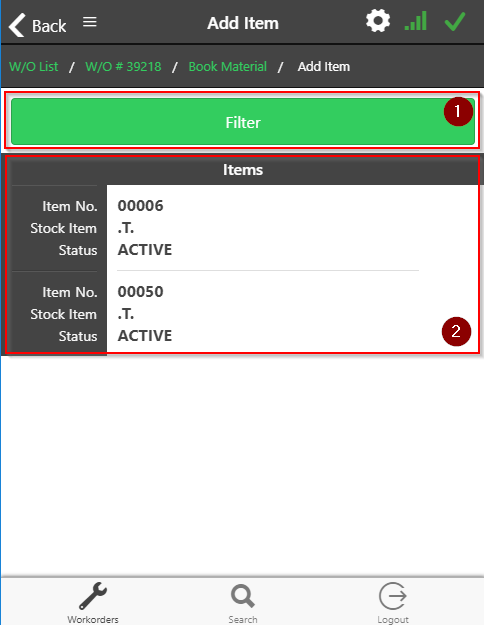

Add Item (Book Material) Screen
If the part required can be found in that list simply tap the line with the item to choose the proper location to pull the parts from, as pictured above.
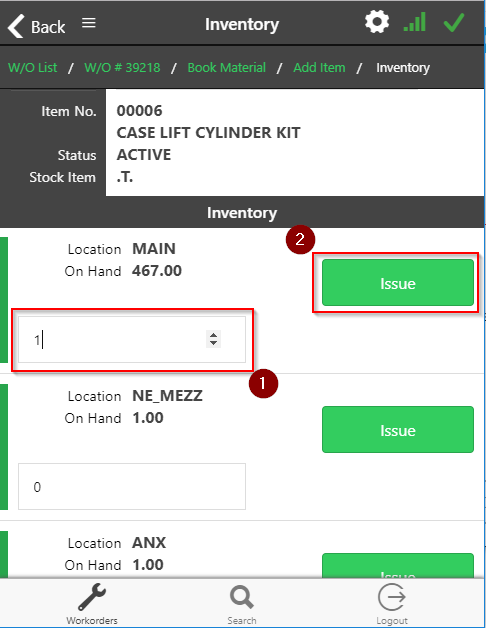

Inventory Location Selection Screen
After selecting the item from the Related Parts list you will be brought to the above screen. From here you can indicate the quantity needed from the proper location (step 1) and issue that amount (step 2).
If the part needed is not related to the work order’s asset, from the Add Item (Book Material) Screen, tap “Filter” to search for a part from Inventory. On this screen, you can search for items based on the Item Number, Description, Manufacturer, Mfr. Part No, or Spare Part Status.
Once a user’s input their search criteria and tapped “Apply Filter” they will be able to make a selection from a list of matching parts and indicate the required quantity and location, as pictured below.
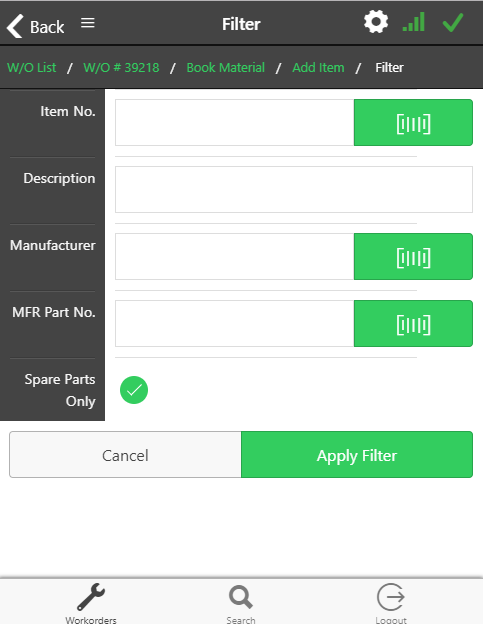

Inventory Search Screen
Adding Parts to a Job
From the Book Labor page in Connect2 mobile users can view existing labor charges or add new labor for themselves or other users. See below for a breakdown of the various sections on the screen with their intended functions:
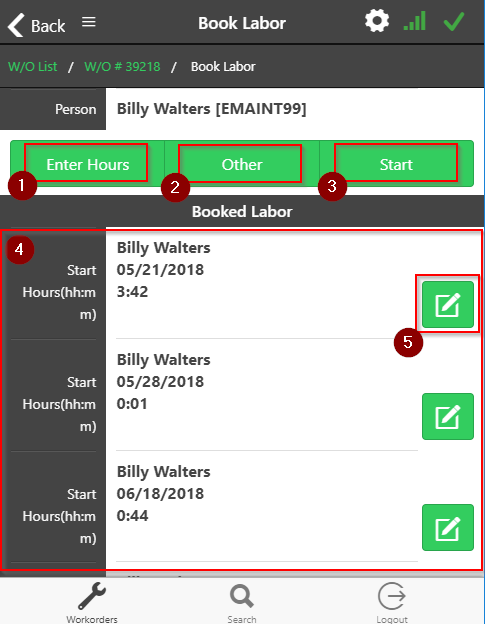

Book Labor Screen
Book Labor Screen (Images Above):
Section 1 (Enter Hours) - Allows users to input hours against their login
Section 2 (Other) - Allows users to input hours against a different contact
Section 3 (Start) - Allows a user to sign onto the work order
Section 4 - Allows the user to view all labor charge records in a list view format
Section 5 - Allows the user to add a comment for a labor charge
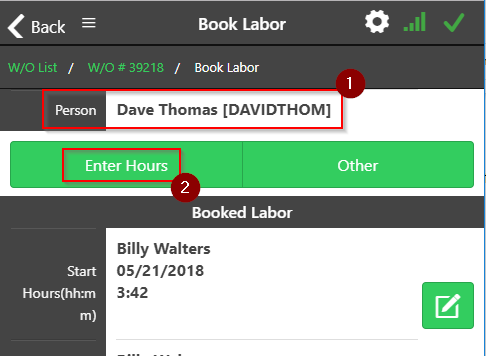
Selecting “Enter Hours” from the Book Labor screen will take you to the following screen where a user can input their Start Date and Hours Worked:
When you choose to change the Hours Worked (step 1) you will be presented with a popup hour selector, as pictured below/
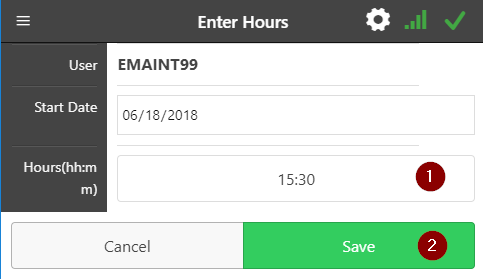
Enter Hours Screen
To choose an hour amount, first slide the hour bar (step 1) to the desired hour, slide the minute bar to the desired minute (step 2), and select “OK” (step 3). Don’t forget to click “Save” on the initial “Enter Hours” screen (step. 2) to finalize the labor charge, as pictured below.
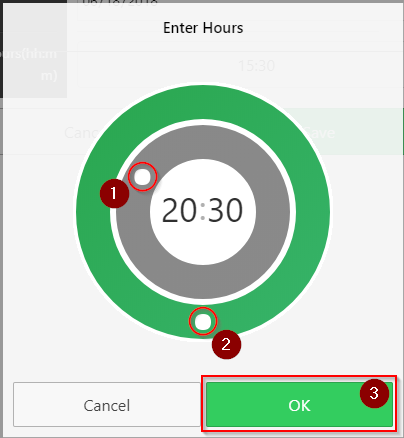
Enter Hours Selection Window
Selecting “Other” from the Book Labor screen will take you to the following screen where a user can choose a new contact to charge labor against. From this screen, a user can input the first 3 letters of a contact’s name (fig. 23 - step 1) to populate a drop-down list for selection (step 2), as pictured below.
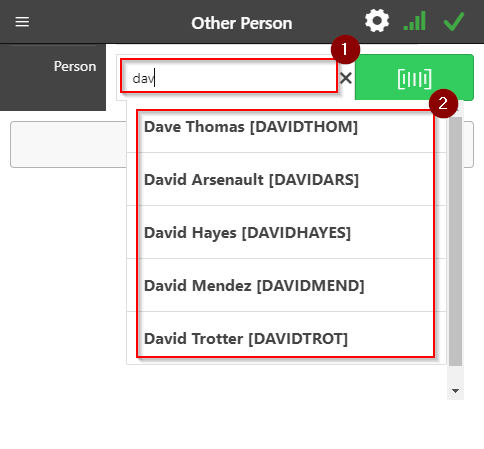
Enter Hours Screen
Once the user locates the correct contact select their name which takes them back to the main “Book Labor” screen with the new contact selected as the current person (step 1). Now the user can enter labor for the selected contact by tapping “Enter Hours” (step 2)

Book Labor Screen with Alternate Contact Selected
Completing a Work Order
In Connect2 Mobile technicians have the ability to “Complete” a work order.
To get started the user must open the work order to be completed. From the work order, the technician can select the “Complete” button to change the Work Order’s Job Status.
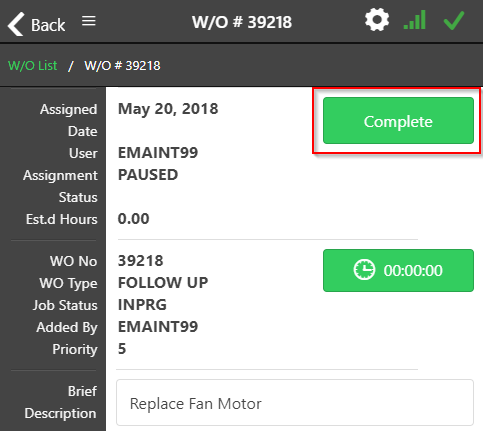

Complete Button on WO Screen
After the user clicks the “Complete Button”, the user will be prompted with the following screen.
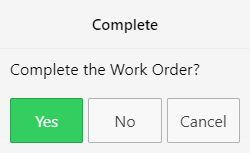

Confirmation Screen from Complete Button
Yes - Yes will complete the assignment for everyone in the work order’s assignment table, change the Job Status to “Completed”, and will close the work order.
No - The Assignment record for the user will be completed but the Job Status on the work order will remain “In Progress”.
Cancel - Returns the user back to the work order without being completed.
Managing Work Order Requests
Connect2 Mobile allows users to add, view, approve, and reject work order requests directly from the app. To get started tap on the "Work Requests" tab along the bottom edge of the screen (see A), as pictured below.
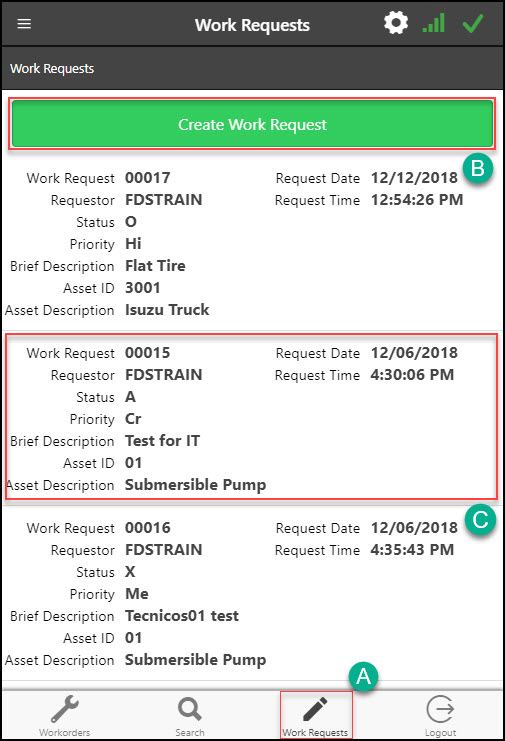
Work Requests Screen
Creating Work Order Requests
To create a new work order request ensure the user is on the "Work Requests" tab, then tap the "Create Work Request" button. The next screen will be a blank request form where a user can fill out the following fields: Asset, Requestor, Phone, Email, Priority, Brief Description, and Work Description (see A). Once a user completes their request tap "Save" to submit the request. (see B), as pictured below.
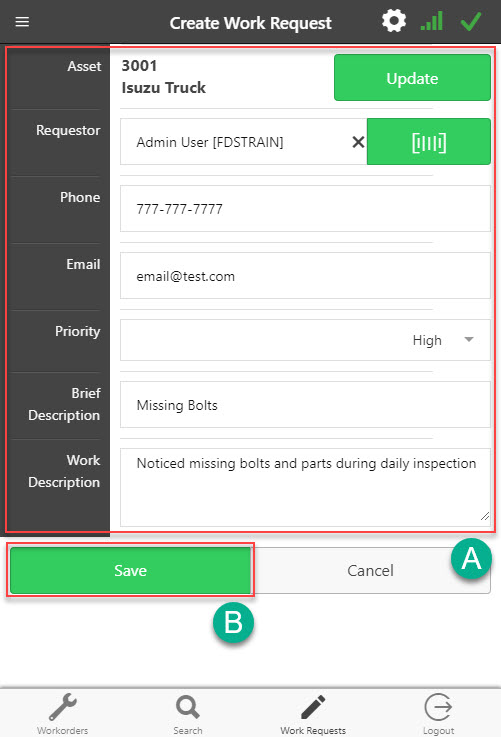
Blank Work Request Form
Approving/Rejecting Work Order Requests
To approve a work order request a user must open an existing request from the "Work Requests" tab. While viewing the request tap the "Approve" button to approve the request. This will trigger a pop up allowing a supervisor to assign the work order to a technician. As soon as the assignment is saved, the work order is created.
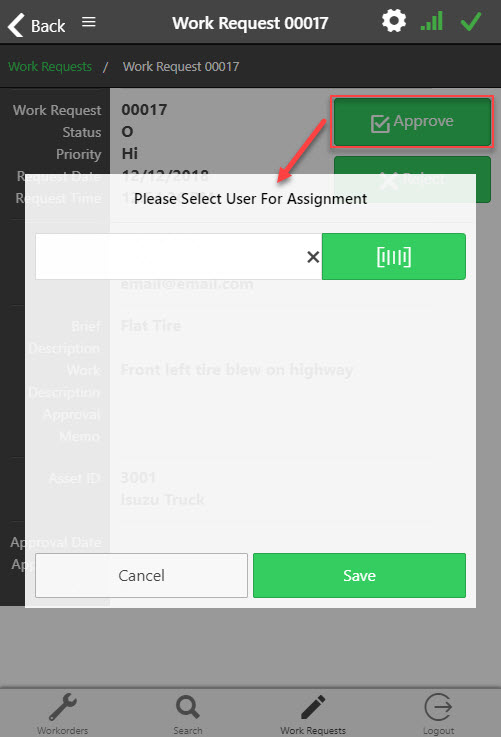
Approving a Work Request
To reject a work order request a user must open an existing request and tap the "Reject" button. This will trigger a pop up allowing a supervisor to type a memo back to the original requestor explaining the reason for rejection.
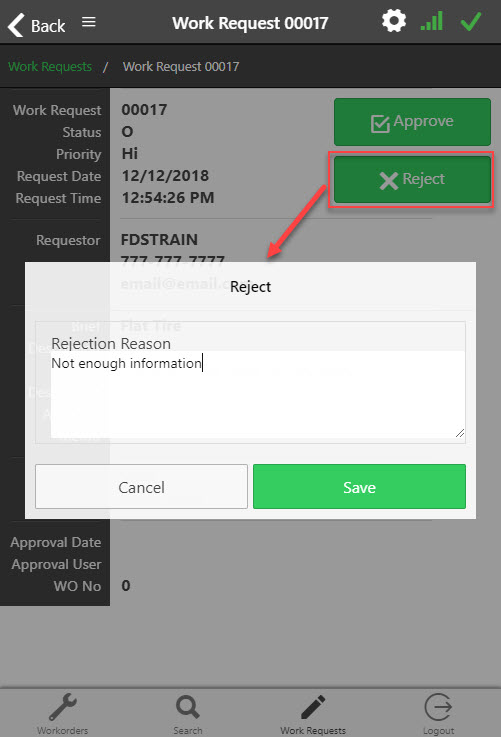
Rejecting a Work Request
Using Connect2Mobile's Integrated Barcode Scanner
Connect2Mobile features an integrated barcode scanner that users can use to quickly find records. Barcodes can be used for parts, assets, and contacts. In a field where a lookup is available, you will be presented with a barcode icon. Tapping on the icon will prompt you to open your devices native camera to scan a barcode. Try to align the red line with the barcode you attempt to scan. Once the camera detects the barcode the system will populate a field with the field with the barcode's value.
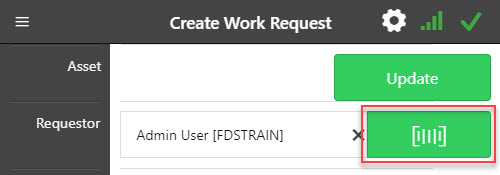
Barcode Icon
Using the Barcode Scanner
Offline Data Sync
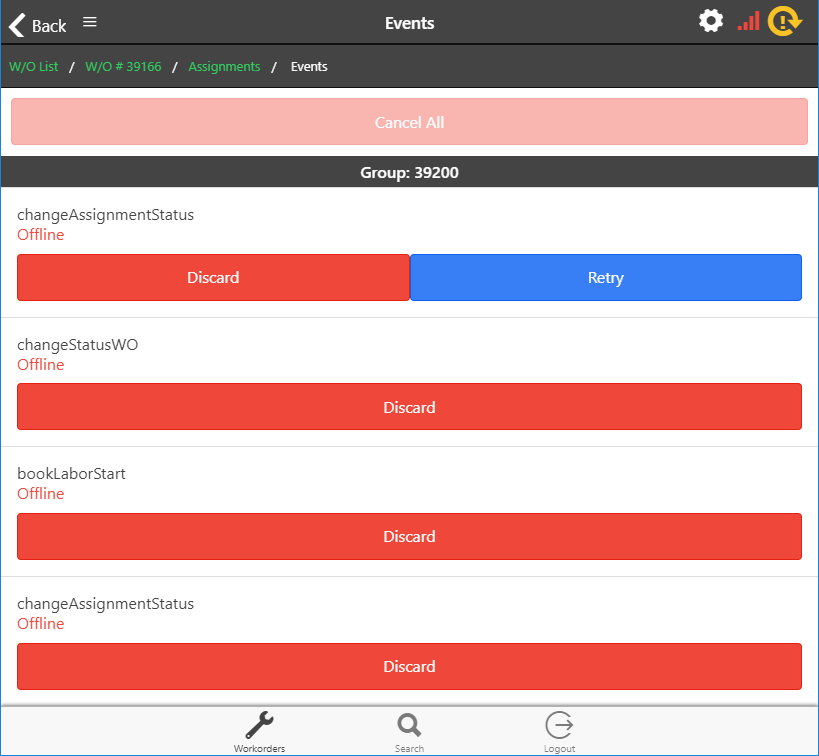
Stored Events for offline users