Table of Contents:
1 - X5 Tabs, Tables and Features
2 - Toggling Left Menu
This session will teach you how to navigate the tabs and tables in eMaint X5. You will learn the functionality of each tab and will gain an understanding on how to use, manage and search your list views, filters and records.
1 - X5 Entities, Buttons and Features
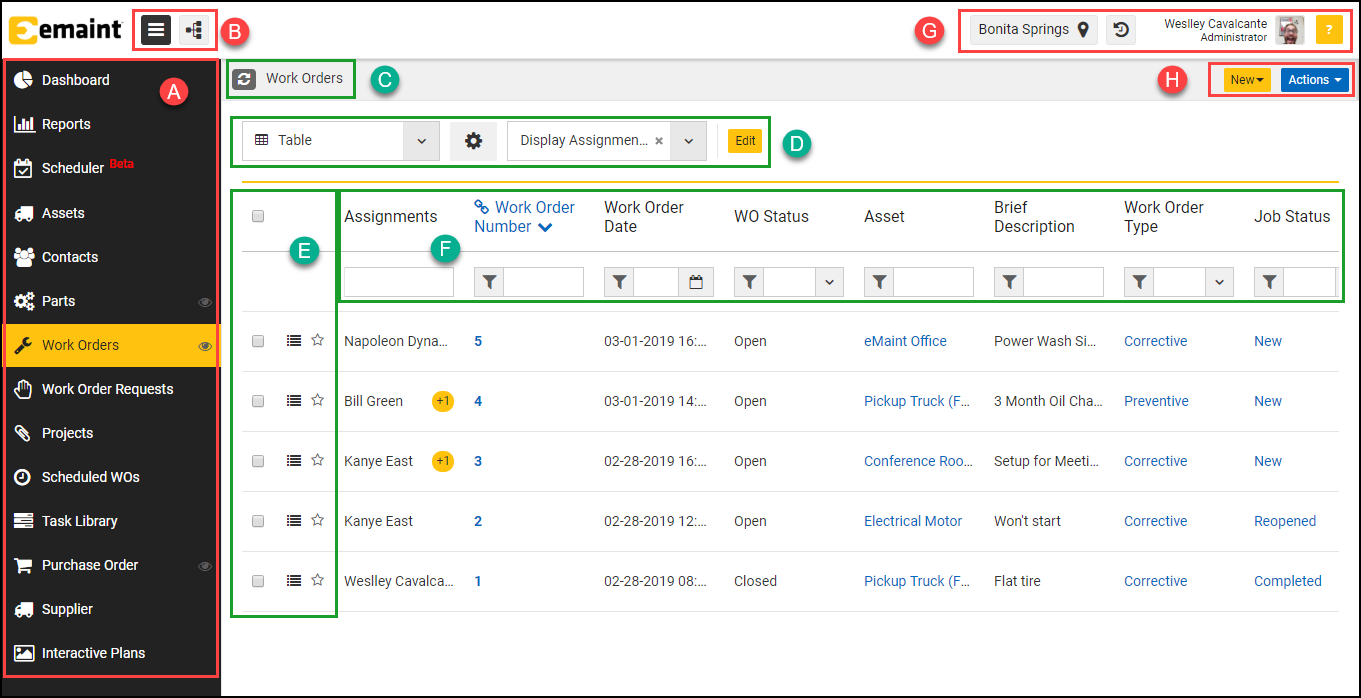
A - In this section, you will see the eMaint system tabs/entities (Work Orders, Assets, Parts, etc). Clicking a system tab will always take you to the record list. Clicking the  icon, will take you to the last record you were looking at on that table.
B - Click the  icon to collapse/hide your system tabs displayed on the left side of the screen; Click the
icon to see the Explorer, where you will be able to group your data and see your records organized in a folder format.
C - Clicking the Entity name will always take you back to the list.
D - The first dropdown in this section will allow you to switch from a list format (Table) to a tile format (Cards). In the  icon you will be able to manage your list columns, choose to display only starred records, and choose to display records that have been archived. In the second drop-down you will be able to select which of your saved filters you would like to use.
E - At the left side of each record you will have three little icons: a Checkbox, a List icon, and a Star.
- Marking Checkboxes for Work Orders for example, would allow you to perform a “Group Closeout” or “Archive” records (these options can be found under the Actions button at the top right hand side of the screen).
- Clicking the List icon will display “Actions” that can be applied to each record (e.g. on the WO list it would give the options to Copy/Add, Archive, Export to PDF, Sign, Close, Reschedule and Email).
- The Star will allow you to mark records as favorites. If you wish to only see starred items on the list view, you would need to click the icon, where you will find the option to do so.
F - This is where you can filter for records on your List view. Clicking the gray funnel icon next to the filter fields will give you the option to select an “Operator” to go with the value you are looking for (equal to, contains, ends with, etc). You may filter by more than one column at the same time and will also have the ability to save filters.
G - The  button will allow you to switch among your sites (this feature will be discussed further in the administrators section of this manual). The
  icon will open the History Panel which will give you access to the two following areas: 1 - A list of recently viewed records; 2 - The Wall (displays notifications about activities on starred items). The
  icon will display your picture (if provided) and will give you access to the Profile Settings, where you will be able to manage which system tabs you want to display on the left side menu. In this area you will also have access to your Account Settings, where you will find all of the administrator features (Integrations, Forms, User Roles, User Permissions, Data Import, etc). The
  icon will give access to training content (Documents, Videos and Live in-app walkthroughs).
H - Click the “New” button to add a new record into the table you are in; The “Actions” section will give you the ability to: Download CSV template, Export list to CSV, Export List to PDF and Send results by email.
2 - Toggling Left Menu
The system allows you to collapse your left menu to gain more real estate on the screen. To do so, click the icon at the top left hand side of the screen.
