This feature is not available for customers at the "Team" account level. For more information on eMaint CMMS plans (account levels), you can contact your Customer Success Manager or email services@emaint.com. This information is also available at http://www.emaint.com/cmms-pricing/#plans-pricing.
From the Purchase Order Master File table, click the plus icon at the top of the list.
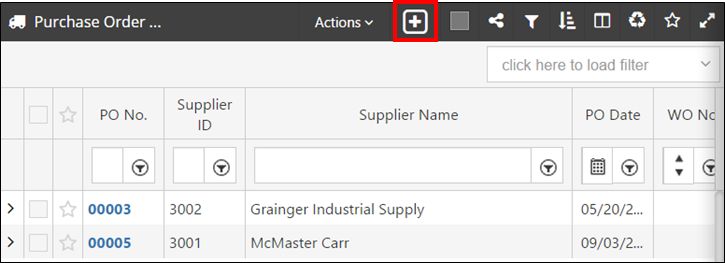
This link opens a blank purchase order form. The first step is to create the PO Header.
POHeader
Purchase Order tab
PONo. can be entered manually or generated automatically, if you leave [AUTO] in that field
PODatedefaults to today but can be changed.
Location is the location for which the items are being ordered. Used for Multi-Inventory accounts only.
WONo. is for the work order for which this purchase is being made. Setting the WO No here will make this the default work order number, when you create the individual lines of the PO. If a work order number is entered for a line item, that line item will show in the Purchase table of the work order detail screen. When the items are received, the work order will show those items as a Purchase charge type and will factor into the total charges for the work order. The work order number can be changed at any time before items are received on the PO.
SupplierInformation is chosen from the pop-up box which takes you to the Contacts file to choose from the Suppliers in your system. Any contact information which was entered on the Contact record will pull into the corresponding fields on the PO after the Proceed icon is clicked. Supplier information can be changed at any time before items are received on the PO.
ShipTo will contain the address information entered on the user's account contact area (found in the My Account page).
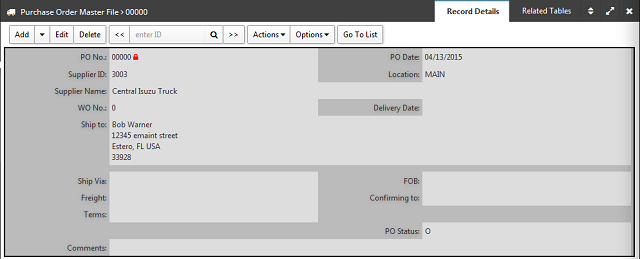
Terms, Comments, Etc.
Enter the information you need in any of the fields on form. This information is optional and can also be customized to suit your needs. The following fields on this tab will appear on the PO form: Delivery Date, Confirming To, Ship Via, FOB, Freight, Terms, and Comments.
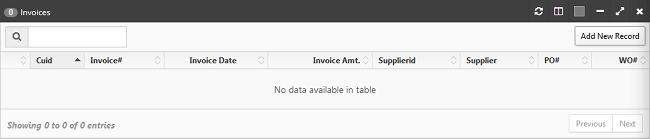
Invoices Table
The ability to enter invoices against this PO will only become available after items have been added to the PO and the PO has been saved.
AddingLineItems
Once you have entered the information on the PO header, you can begin adding line items. Click the Add button on the Detail Lines table to add a new line item.
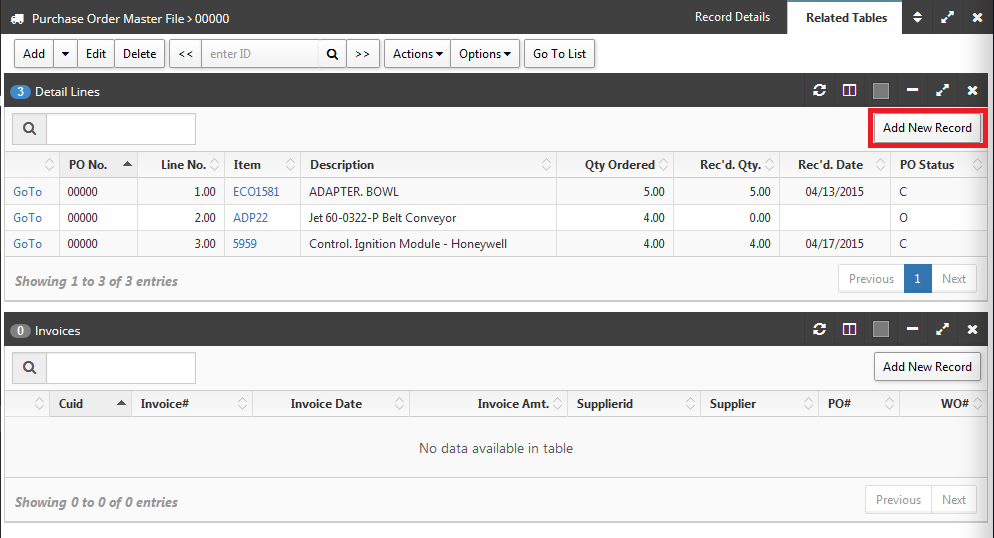
Enter the quantity desired; this field will be highlighted ready for entry.
To select an item click on the lookup folder (from the Parts Listing). After selecting the item, fields like Description and Cost will automatically fill in with the information from the part record. You can make any changes to these fields if necessary.
Click Save Entry to save the line and keep the form open, so you can add more
Click Save and Return to save the line and close the form.