Setting up Inventory Items in Different Locations
Creating Part Record
You can add new parts from either the Parts list view or a Part's detail screen. From the parts list, select Actions and then click the Add New Record button. From the detail view of a part, click the Add or Copy/Add buttons on the menu bar.
Creating a new part record is a process similar to creating any other records in the system. In order to add a new part you need to:
Specify the “Item No”, adhering to the X4 specifications for the key fields (NO Spaces or Special Characters !@#$%^&*). Also, fill in the “Description” field.
Enter the item Cost into the “Unit cost” field.
Populate the “Re-Order Point” (amount that will trigger reordering) and the “Re-Order Qty” (default amount to be reordered).
If this is an item that you always need to have in your storeroom make sure that the “Stock Item” field is set to “True”. This field dictates whether the part is automatically pushed into the Re-Order list when the On-Hand Value equals or falls below the Re-Order Point.
Add any other necessary information (if needed), then Click “Save New Record”.
Now you will see a popup window prompting you to setup Quantities for the first location that you would like to associate with this part. Click “Save & Return” when you are done.

Note: The Re-Order Point and Re-Order Qty are directly tied into eMaint’s ordering system. Parts are considered to be in need of ordering based on the following criteria: Stock Item is equal to True and On Hand quantity, plus On Order quantity is equal to or below the Reorder Point.
IMPORTANT NOTE
YOU WILL NOTICE THAT WHEN FIRST CREATING A PART RECORD, THE “ON HAND” VALUE CAN NOT BE MODIFIED. THE REASON FOR THAT IS BECAUSE THIS FIELD IS DESIGNED TO BE AUTOMATICALLY POPULATED WITH THE SUM OF “ON HAND” AMOUNTS IN ALL THE LOCATIONS ASSOCIATED WITH THE ITEM.
THE RE-ORDER POINT ON THE PART FORM WILL ONLY BE REACHED WHEN NEGATIVE TRANSACTIONS FROM DIFFERENT LOCATIONS CAUSE THE ON-HAND VALUE (ON THE PART FORM) TO MATCH OR GO UNDER THAT POINT. THIS MEANS THAT AT TIMES YOU MIGHT RUN OUT OF PARTS IN ONE OF THE LOCATIONS AND NOT REACH THE REORDER POINT DEFINED ON THE PART FORM. IF THIS REPRESENTS AN ISSUE FOR YOUR ORGANIZATION, YOU WILL NEED TO MAKE SURE YOU ARE DEFINING A REORDER POINT AND REORDER QTY FOR EACH LOCATION. DOING SO WILL ENABLE THE SYSTEM TO SEND OUT NOTIFICATIONS WHEN PARTS REACH THE REORDER POINT IN EACH LOCATION. IN ADDITION TO THAT, PARTS WILL BE PUSHED TO A RE-ORDER LIST (CREATE STOCK REQUISITION SCREEN) WHERE THEY WILL BE CATEGORIZED BY THE DEFAULT SUPPLIER DEFINED ON THE SUPPLIERS TABLE. FURTHER IN THIS DOCUMENT YOU WILL FIND MORE INFORMATION ON THE RE-ORDER LIST FOR ACCOUNTS WITH MULTI INVENTORY LOCATION ACTIVATED.
Inventory Locations Related Table
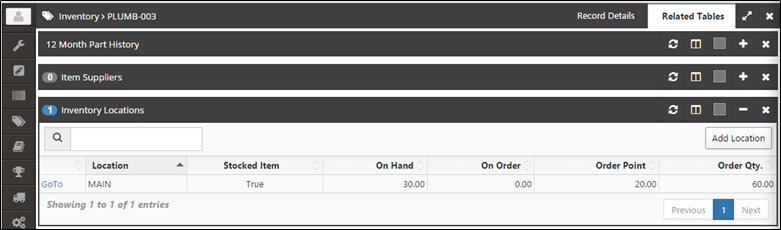
Once Multi-Inventory Locations is activated in your account, you’ll have a new related table available on the Inventory module. If the table is not being displayed, it can be added by clicking Manage Related Tables under the Options menu.
This Related Table shows the on hand quantities, for this part, in the various different locations.
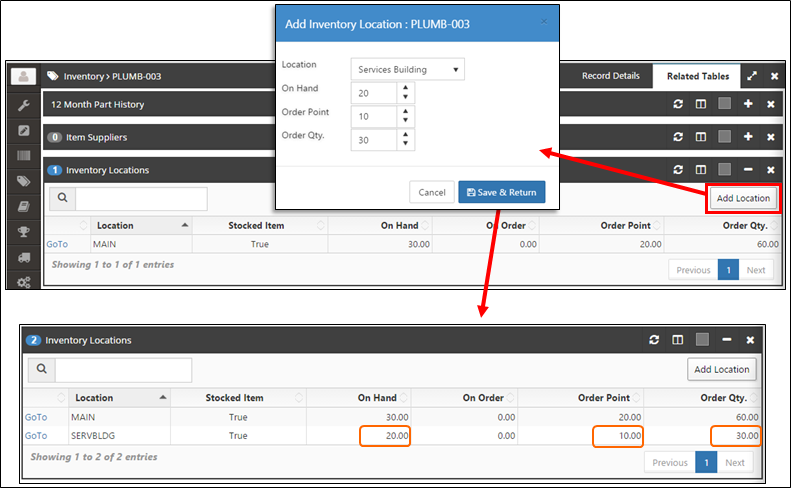
Associating Parts with other Locations
To associate an item with other locations you will need to click the the “Add Location” button, select a Location from the dropdown list, then provide the following values: On Hand, Re-Order Point and Re-Order Qty.
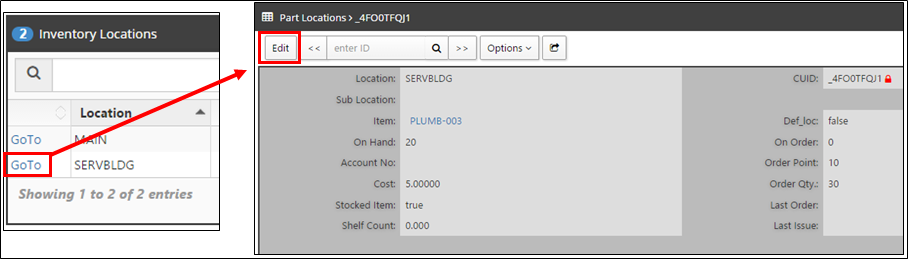
Once the new location has been associated, if you need to make any changes to it click the “GoTo” button next to that location to access the Part Location form, click Edit, then make the necessary changes.