The Work Permit feature allows you to store your Work Permits in PDF format in our Document Storage and associate them with an existing PM. When the PM is generated the WO will have the permit attached in a related table and can be edited using our in-application PDF editor. Work Permits can also be associated directly with a Work Order as well - not just from a PM.
1 - How does it work?
A - Users will upload their PDF Work Permits to eMaint. All Work Permits can be uploaded at once to Document Storage, or by uploading them one at a time as their Work Permit records are created.
B - Users will then associate these permits to PM Schedules (or Work Orders). This can be done through a related table on the PM called “PM Work Permits” (at the Work Order level it's called Work Permit).
C - Once a WO is generated from a PM, navigate to the Work Permit related table, open and fill out the permit (with the in-app PDF editor) and then save it. The system creates a copy of the original permit and links it to the WO.
2 - Uploading Work Permits to Document Storage
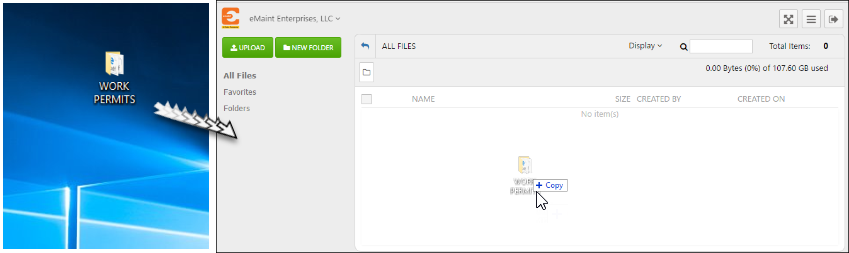
You can mass upload all of your Work Permits into Document Storage. You are also able to move them one at a time as records are being created in the Work Permit Master File tab.
To quickly mass upload your permits, if you already have a folder on your computer with all Work Permits, you can easily drag and drop that folder in to Document Storage.
Result
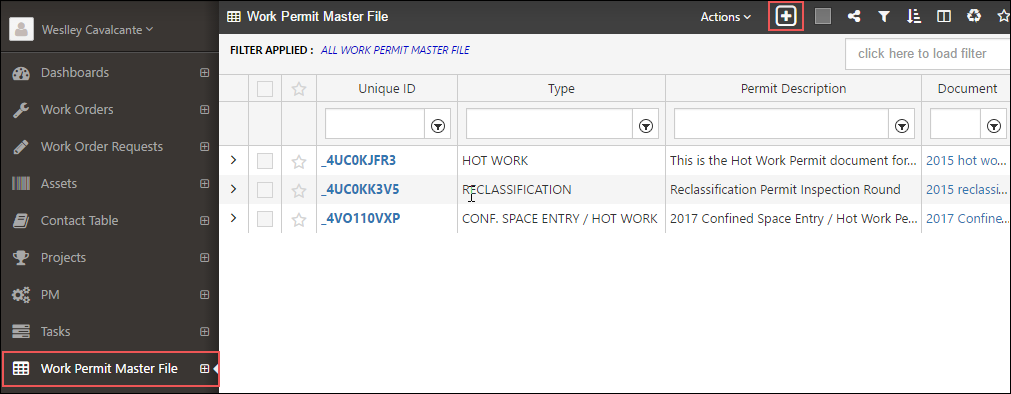
3 - Creating Work Permit Records (Work Permit Master File Tab)
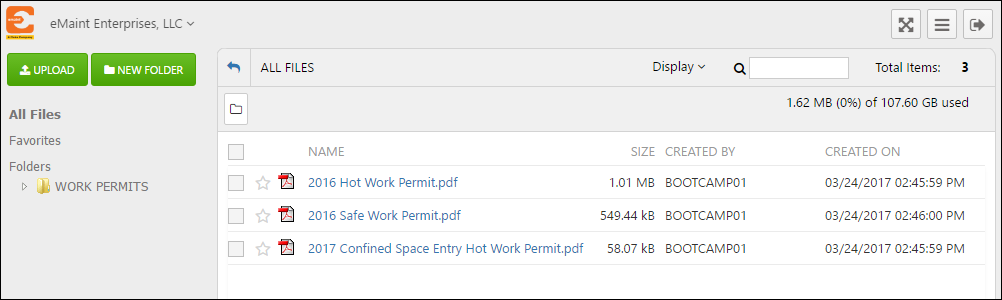
Now that PDF Work Permits exist in Document Storage, it's necessary to create a record for each permit in the Work Permit Master File (see below), and link the appropriate PDF to that record.
The Work Permit Master File Tab on the left menu is where you create records for all your permits. To do so, navigate to this tab and click the plus button at the top of the list.
Once on the Work Permit form, follow the steps below:
- Fill out the Permit Type field (this field can also be turned into a lookup field, so Types can be selected from a list).
- Provide a more detailed description of the Permit in the Permit Description Field.
- For the Comments field you can add additional information pertaining to the permit.
- In the Document field click on the three dot icon to access your files in eMaint’s Document Storage. Navigate Document Storage and find the PDF file that corresponds to this Work Permit. Hover over the name of the file then click on the link icon to link that document into the Document field on the Work Permit Master File record.
- Hit the “Save New Record” button when you are done.
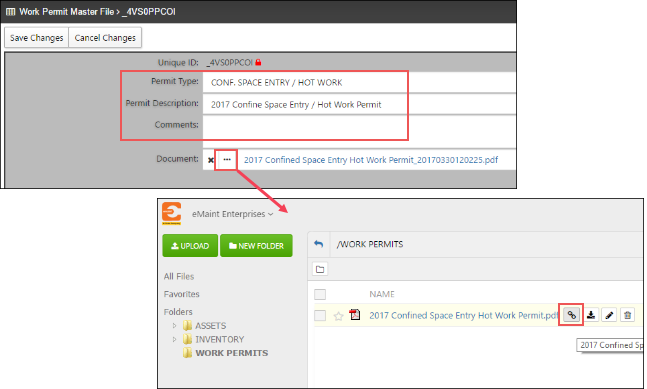
Note - If the document you need for this record is not already in Document storage, you can upload it at this time.
3.1 - Making PDF Permits Editable
Completing a Work Permit is part of the Work Order process, and if required, must be done before the Work Order can be closed. In order to allow someone to close a Work Order with a Work Permit, they must be able to "complete" a Work Permit. To complete a Work Permit, you first need to use the in-app PDF Editor to make the fields on the Work Permit editable.
Note: Be cognizant of which users, if any, are allowed to edit and/or delete Work Permits (these permissions can be managed in the User Administration section).
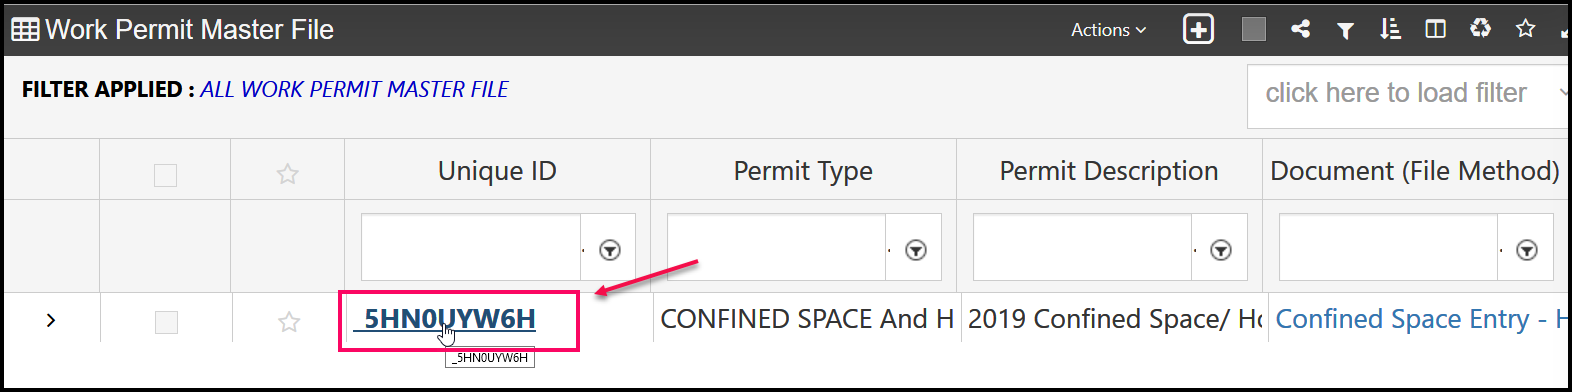
To begin making your form editable, navigate to the Work Permit Master File Tab and click on the Unique ID for the Permit you want to make editable.
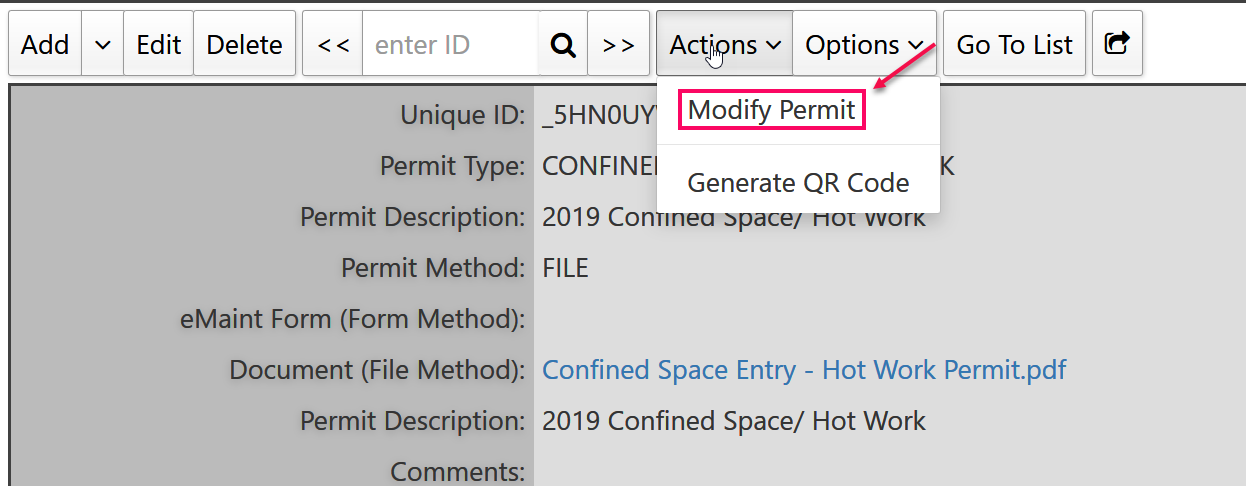
Now hover over the Actions button and click on Modify Permit. This will take you to the blank PDF form within the in-app Editor that you uploaded in Document Storage.
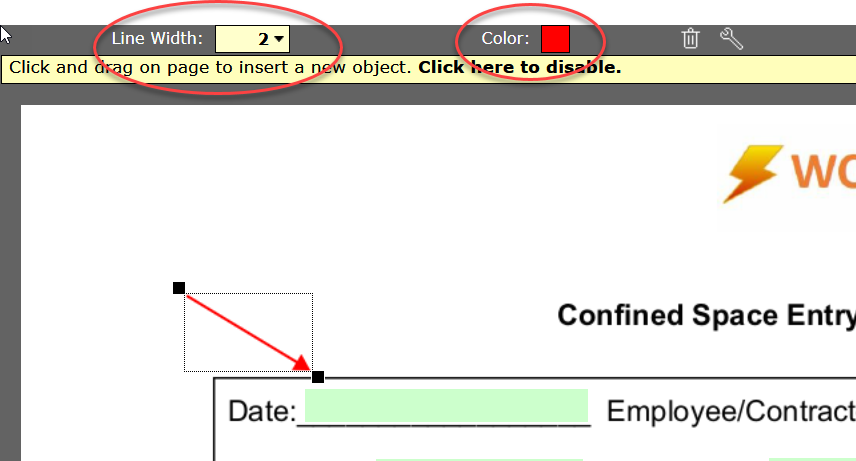
At the top of the form, you will see the PDF editing tools. Below are the most commonly used tools when making Work Permits editable.

A - When adding an arrow you will be able to select the color and thickness, and draw the arrow anywhere on the document.
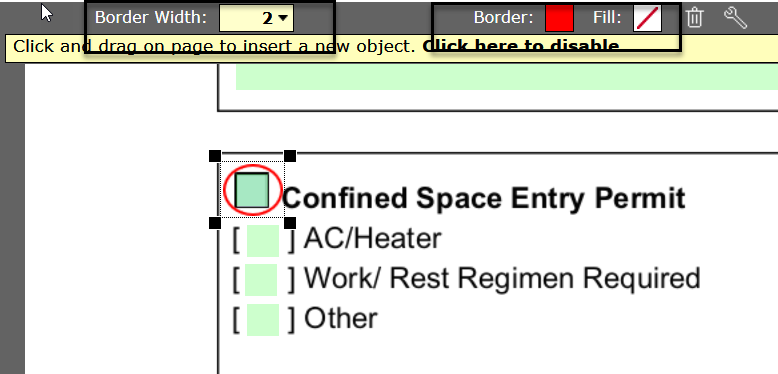
B - When selecting the Circle icon you will have the option to change the color, the boarder width, and if the circle is filled in. This tool is used often to mark or select options on the form.
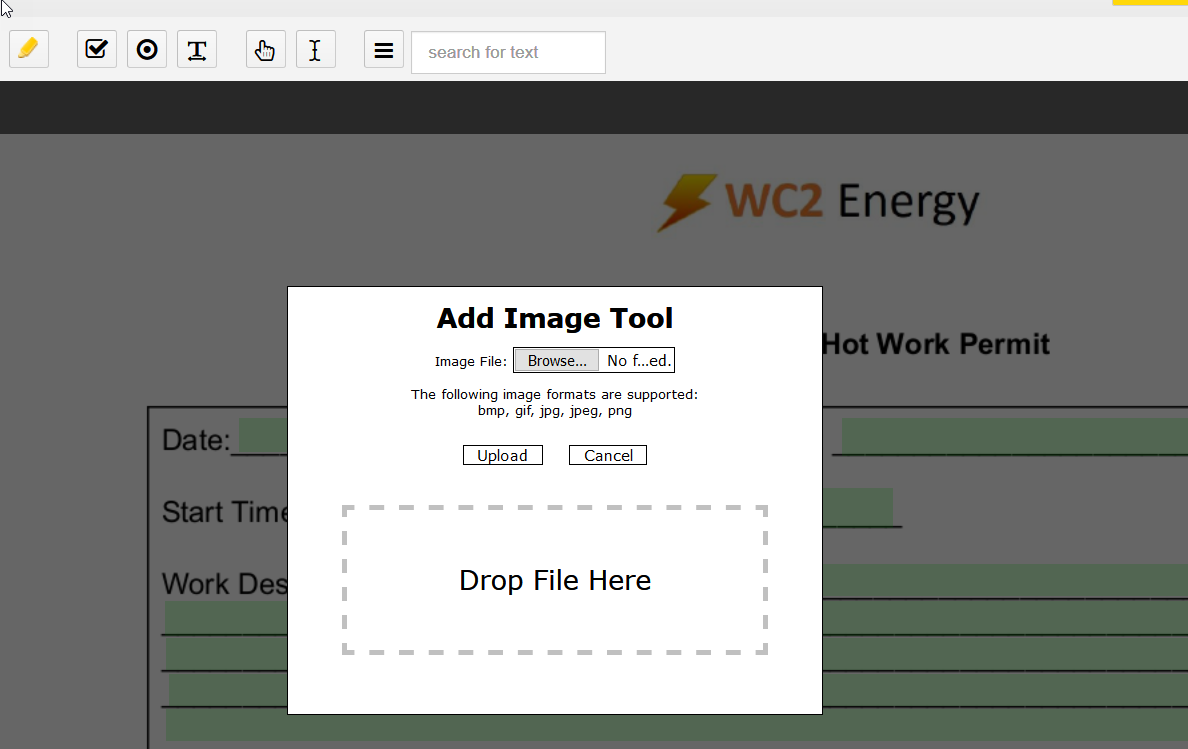
C - The insert image tool allows you to add images from your computer onto the form. You can browse to upload a file, or drag and drop the file into the tool.
D - The Checkbox icon makes fields into Checkboxes allowing someone to check it if the scenario applies. You can either have a check already on the form, or leave the area blank for someone to check. You can also change the color.
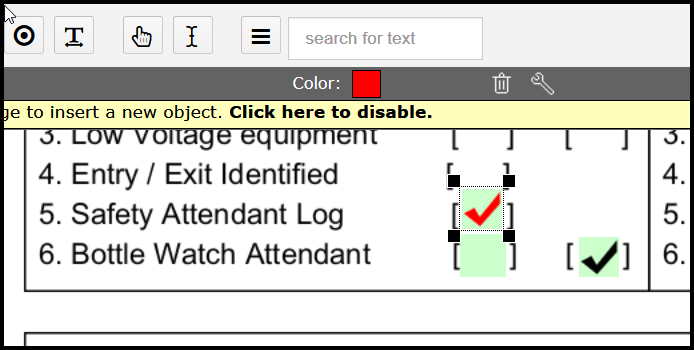
Note: When adding checkboxes at this level, you will want to make sure that they are unchecked.
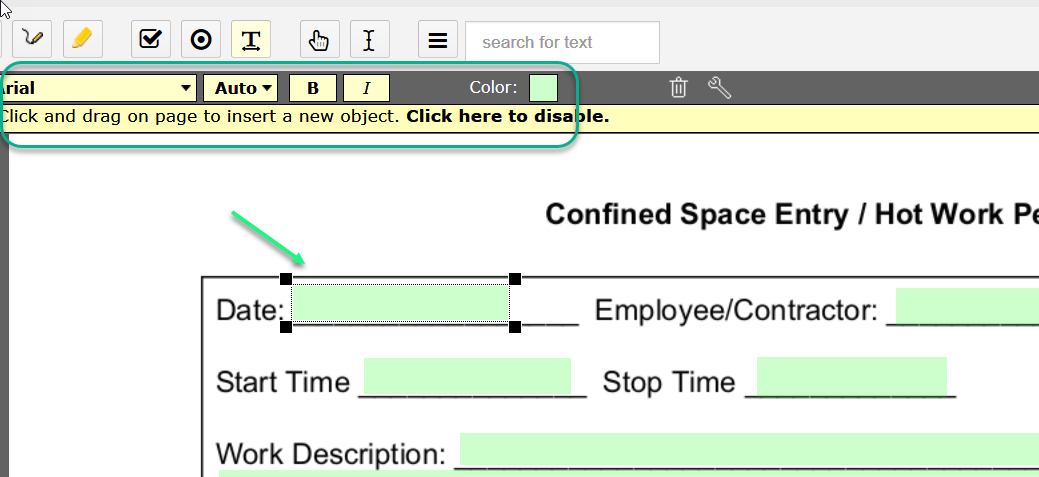
E - The Text icon is one the most important tools as it allows you to make empty spaces on to the form into areas where users can type in responses. To make fields editable so someone at the Work Order level will be able to type into the document, use the "T," or Text Box icon, and drag your cursor to create highlighted areas (where someone will be writing in text). When selecting this tool you will be able to select a background color, font, and font size. You can also add Bold text and underline text.
.
Note - At the top right-hand side of the screen you have the option to “Save Document,” which saves your current changes and allows you to come back to this permit, at a later time, to complete it.
4 - Associating Permits to PM Schedules
To add your Work Permits to a PM:
A - Navigate to a PM Schedule by going to Asset Related Tables (or through PM list).
B - Go into the PM Schedule.
C - Access PM Related Tables.
D - Once at the “PM Work Permits” table click add a new record and fill out the form accordingly. This is where the Permit can be required on the Work Order before it can be closed.
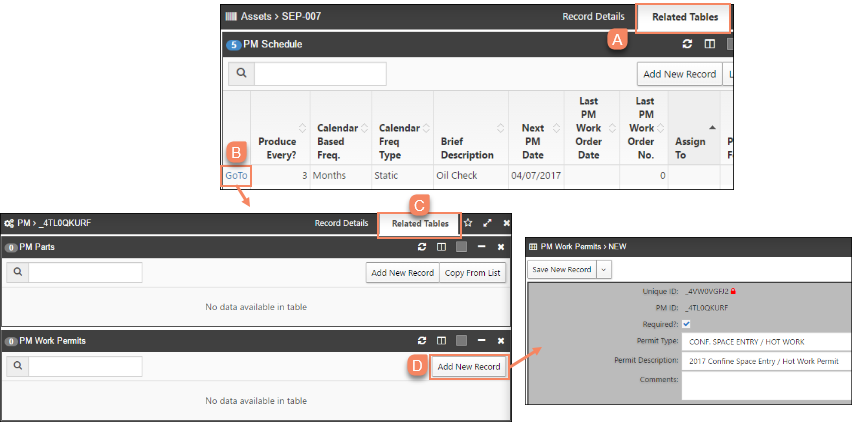
Note - Upon generating a PM, the “PM Work Permits” will carry over to the “Work Permits” table on the Work Order.
5 - Completing WO permits at WO Level (Using in-app PDF editor)
As part of the WO process, your users will need to complete all required Work Permits (using the in-app PDF editor).
The story below demonstrates the usage of this feature:
“Dwight logs in to his account, navigates to one of his Work Orders and starts adding information to it (Charges, Comments, etc). As part of the process, he goes into the Work Permit related table, opens the permit and edits it using the available tools within the PDF editor. When he’s done, he clicks the complete document button on the Work Permit. Upon Completion, the system automatically makes a copy of the original, then uploads it to Document storage and puts a link to it at the related table.
Note that Dwight does not have editing or deleting options for the Work Permit Table, thus completing the required Work Permit is the only way to close his Work Order.”
Now let’s simulate the story above in eMaint. The steps below will demonstrate how to complete a Work Permit at the WO level:
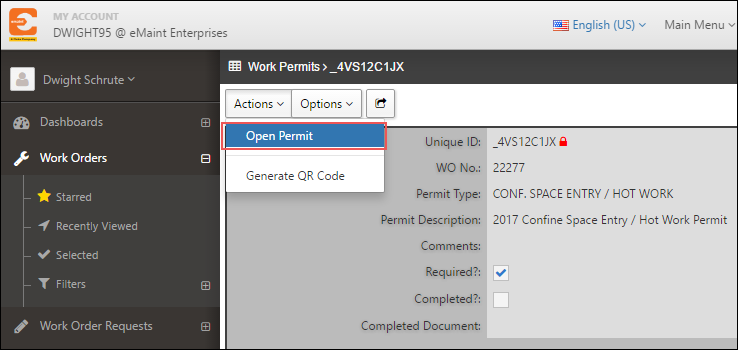
B - Once on the Work Permit form, hover over the “Actions” button and click on “Open Permit."
C - Now you can see the Work Order Permit within the PDF Editor. Using the tools at the top you will be able to write, circle, sign, add images, etc. In the example below, we placed “Text” boxes onto the form so users can just type into the fields. We also used the “Checkbox” option to allow users to populate the checkboxes on the form. Using the Free Hand icon, you can write free form, handwritten text as well.
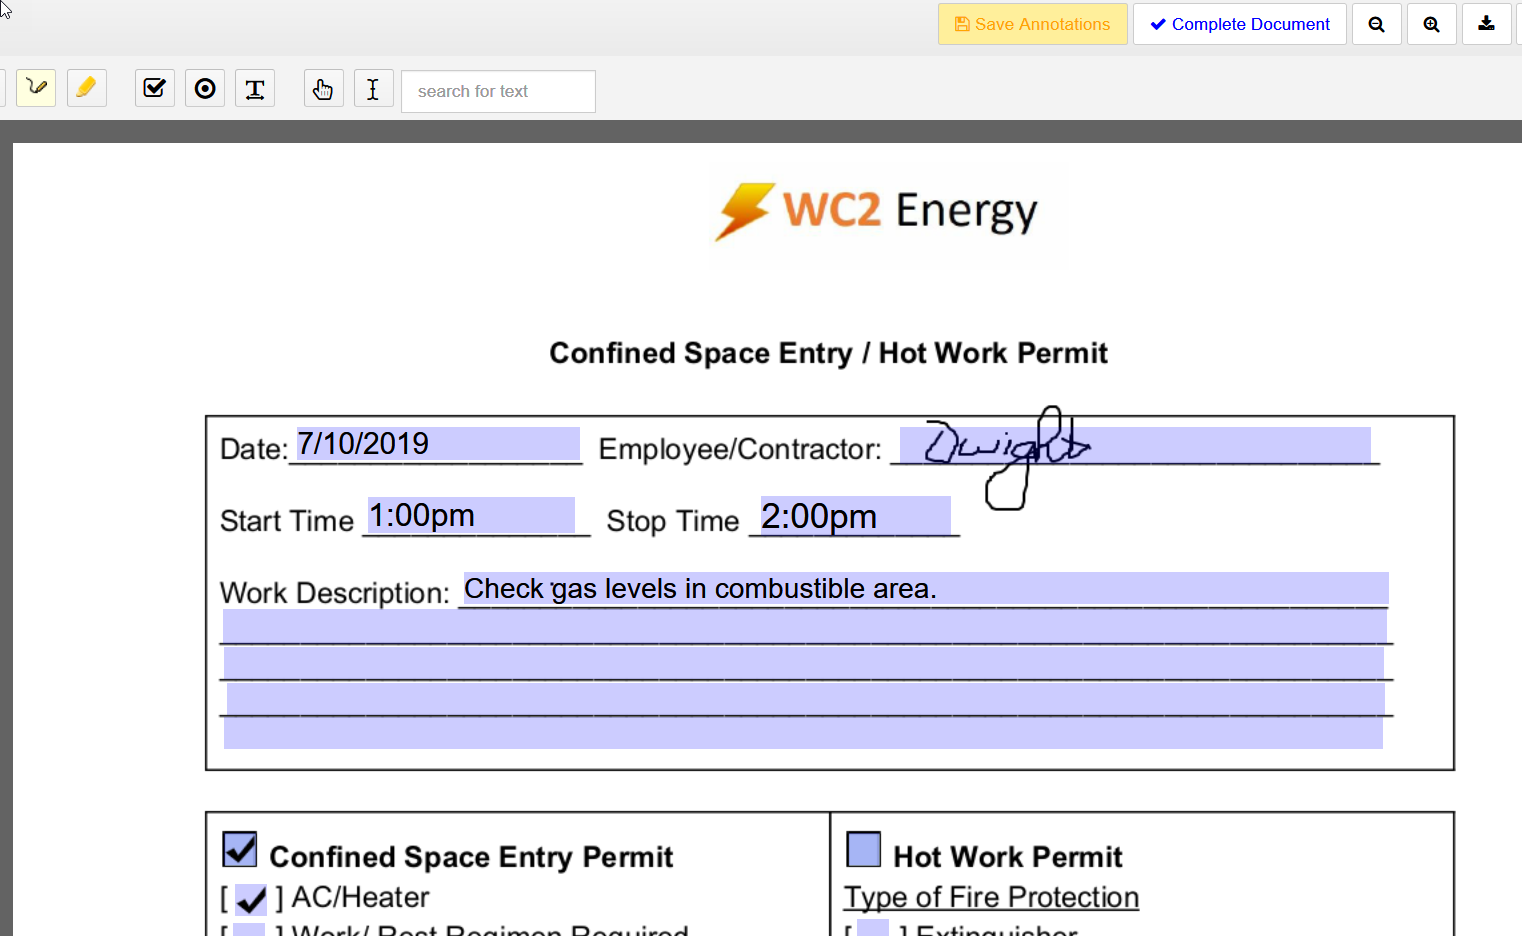
Note - At the top right-hand side of the screen you have the option to “Save Annotations," which saves your current changes and allows you to revisit the permit to complete it later. Once you click on “Complete Document” you won’t be able to go back to make changes.
Once you Complete the Document, the system will automatically mark it as completed and will provide a link to the completed PDF, which now resides in eMaint’s Document Storage. Note that the WO number is now included in the document’s title, so it can be easily found from the Document Storage screen.

6 - Printing permits from WO list
There’s additional functionality from the Work Order List View that allows you to select many Work Orders to batch print the Work Permits. To use this feature, select the desired WO(s), hover over the “Actions” button and select the “Print Work Permit” option.
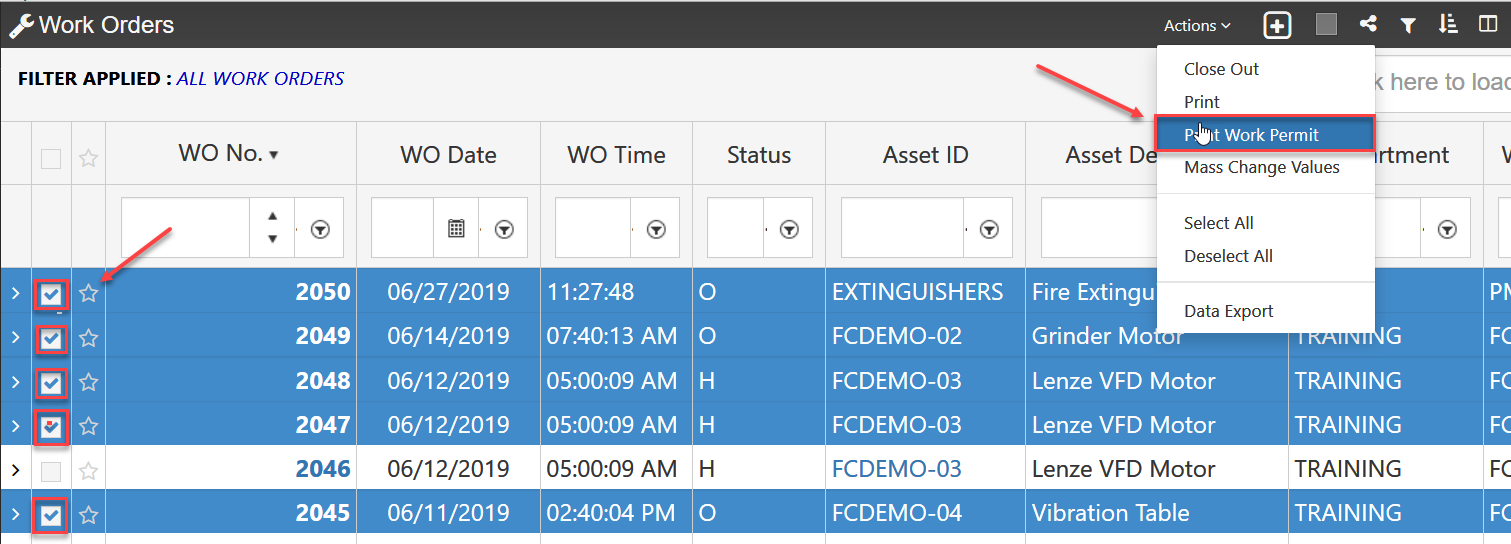
On the popup window, select the Permit Type, then check the box if you want to include the Work Orders in the printout, and click “Print."
Additional Info
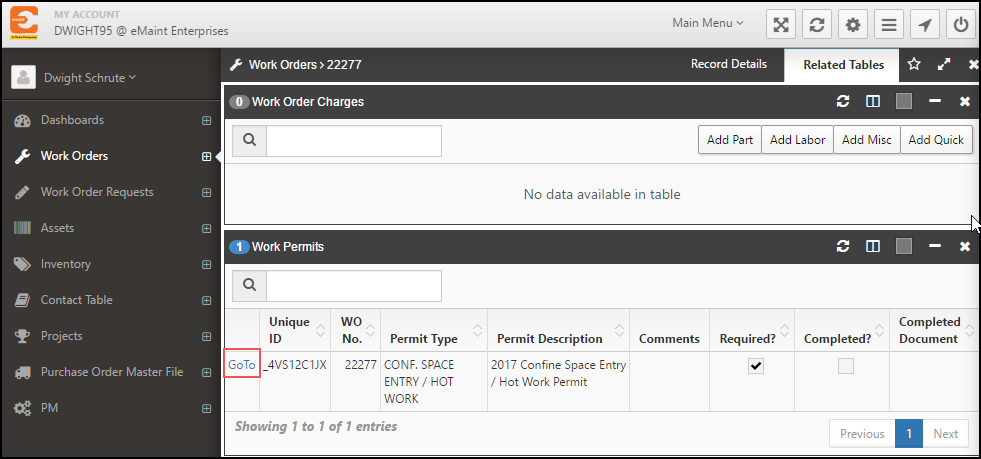
8 - Associating Permits to Work Orders
To associate Work Permit(s) directly with Work Orders (not from a PM) follow the steps below:
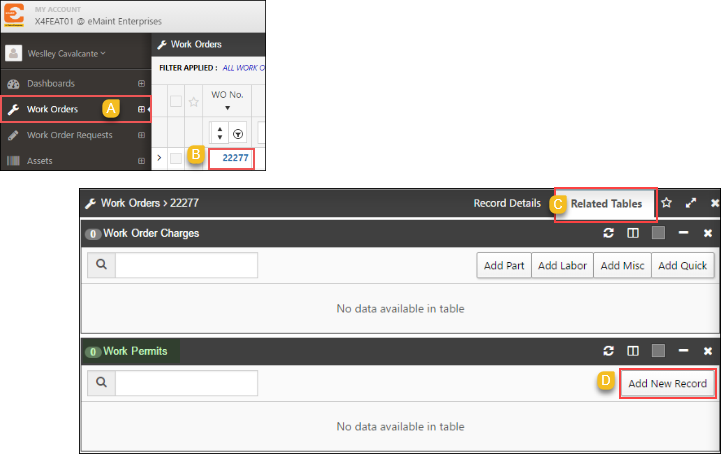
A and B - Navigate to the Work Order table and select a WO.
C - Click the Related Tables at the top of the screen and scroll down until you see the “Work Permit” table. If you don’t see the this table within your WO Related tables, you may need to add it (refer to the Additional Information section below).
D - Click the “Add New Record” within that table.
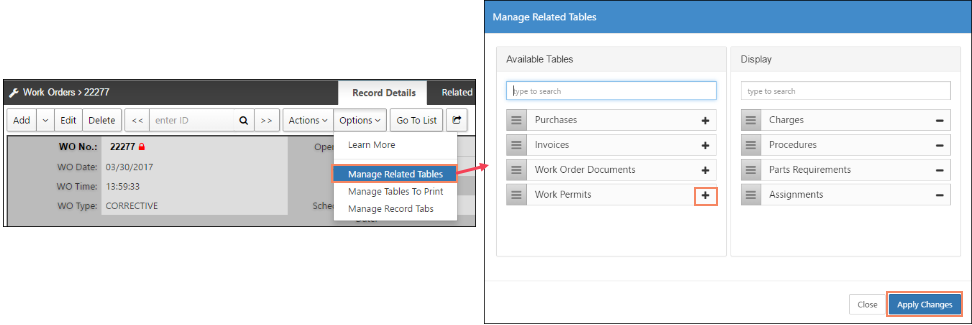
Displaying the Work Permit Related Table on Work Orders
If the “Work Permit” Related Table is not already on display, go into the Record Details of a WO, hover over the Options button, click the “Manage Related Tables” option, click the plus sign next to this table, then hit “Apply Changes when you are done.
Once you see the Work Permit form, follow the steps below, beginning with "Add New Record:"
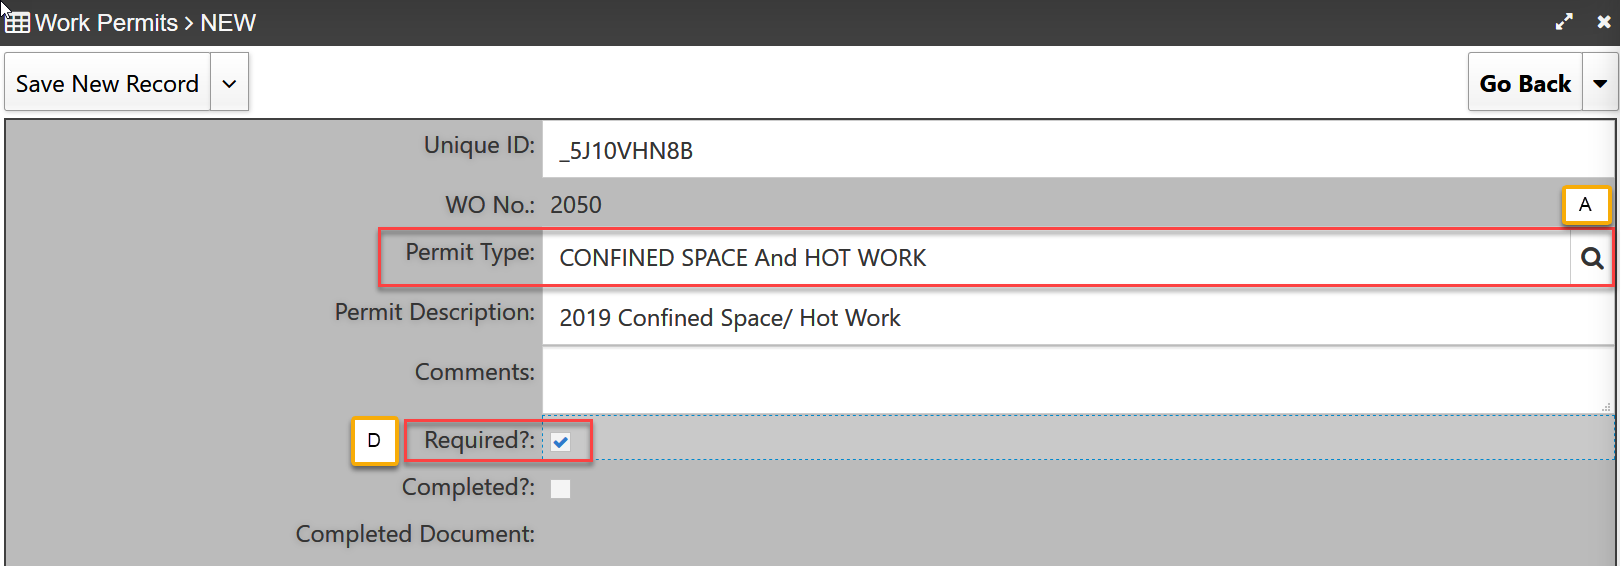
A - Next, click the magnifying glass on the “Permit type” field to pull up the list of permits.
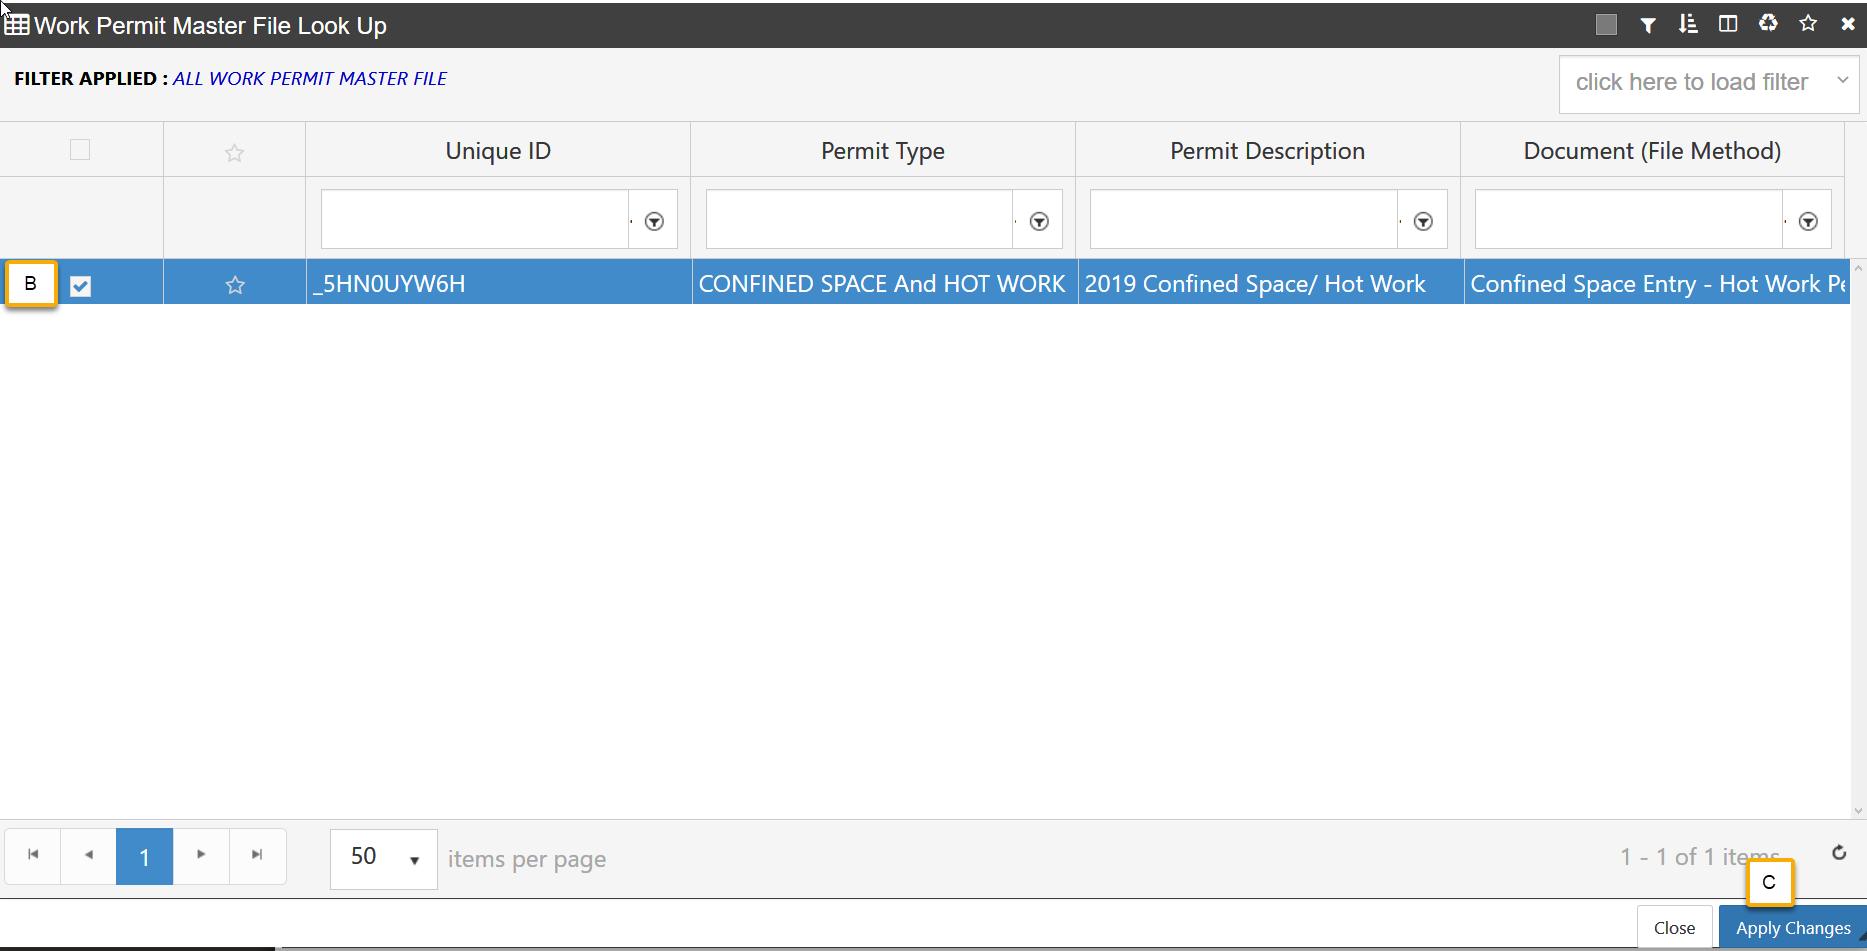
B and C - On the popup window (Work Permit Master File Lookup), select your permit and hit the “Apply Changes” button.
D - If the completion of this document is required, put a check mark on the “Required” field. By doing so, the system won’t allow this WO to be closed until the Permit has been completed.
Click the “Save New Record” button at the top when you are done. Repeat this process if you wish to add more permits to the same WO.
Note - The “Completed?” and “Completed Document” fields above in the Work Permit related table cannot be manually edited, as they are designed to populate automatically upon completion of the WO Permit. The former will populate with a check mark and the latter with a link to the completed document.
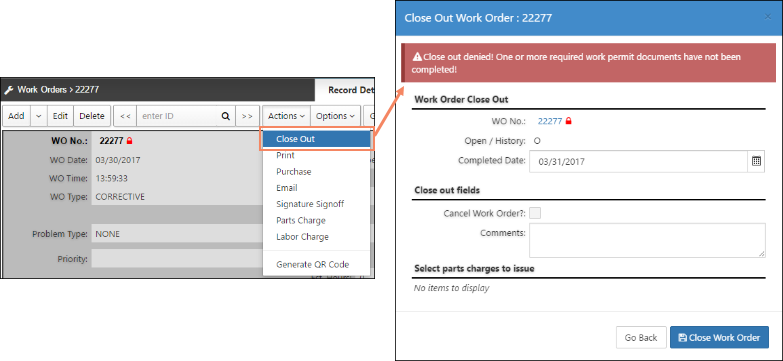
As mentioned above, Work Orders with required Work Permits can only be closed after the permit is completed. See the images below as an example of trying to close a Work Order without the required Work Permit.