Introduction
The Fluke Connect / X4 integration will allow eMaint users to trend data being tracked by FCCM devices in real time. Below is a list of the functionality between the two systems.
- Synchronize eMaint X4 Assets into Fluke Connect
- Link eMaint X4 Assets to existing Fluke Connect Assets
- Trend Live Readings from Fluke Connect Condition Monitoring devices in eMaint X4
- Available on the Asset Record, Asset Related Tables, or the Dashboard
- Export Data Feeds from Fluke Connect in eMaint X4
- View Fluke Connect Notifications in eMaint X4
This feature set is not turned on by default. If you would like access to this functionality, please contact your Customer Success Manager.
Connecting X4 to Fluke Connect
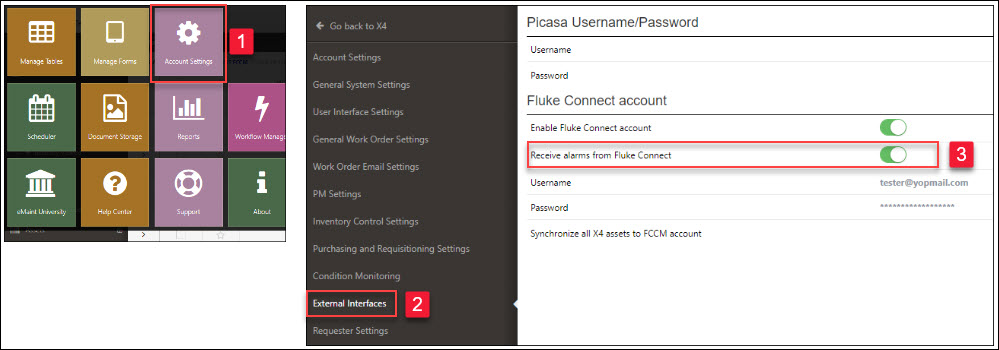
To link your eMaint X4 account to your Fluke Connect Condition Monitoring system, go to Account Settings -> External Interfaces. From the External Interfaces screen, you will have the ability to type in your Fluke Connect Username and Password. Once the credentials are entered, turn on the “Enable Fluke Connect Account” option. The system will authenticate the credentials and allow the systems to connect.
Enable Fluke Connect Account - Turns on the link between eMaint X4 and Fluke Connect Condition Monitoring. A valid username and password has to be entered before the setting can be turned on.
Username - Fluke Connect Condition Monitoring Username.
Password - Fluke Connect Condition Monitoring Password.
Synchronize all X4 Assets to FCCM account - Allows users to create asset records in Fluke Connect Condition Monitoring based on the Fluke Connect Asset field on the Asset record being set to “True”.

Synchronizing eMaint Assets into Fluke Connect
To create asset records in the Fluke Connect software based on existing eMaint assets, the first step is to set the field “Fluke Connect Asset” to “True” on the assets you plan to connect Fluke Hardware to. The “Fluke Connect Asset” field can be added to the Asset form from the “Manage Forms” section in eMaint.

Once the asset records have been updated, you will go into Account Settings -> External Interfaces to Synchronize the Assets into the Fluke Connect software. Click the “Synchronize Now” button to create the asset records in Fluke Connect. Only new records that have not been created yet in Fluke Connect will be added to prevent duplicate asset records.
Connecting Existing FC Assets to existing eMaint assets
In the situation where the Asset records are already created in both eMaint X4 and Fluke Connect, users have the option to link the records. To link the records, go to the eMaint Asset that you wish to link to an existing Fluke Connect Asset. Go to the Actions dropdown and select “Link to FC Asset”.

A screen will popup with a list of all asset records that exist in Fluke Connect. Users can search for the asset record that exist in Fluke Connect. Once the asset has been selected, click the “Proceed” button to establish the link between the two systems.
Trending Fluke Connect Condition Monitoring Data on Asset Records
To begin displaying data being logged by Fluke Connect Condition Monitoring devices, the user will need to create a new field on either the asset record or on a related table. To create the field, go to Manage Forms and select the table you would like to create the field on. Click on an available yellow folder on the Design Mode page to create a new field.
Below is an example of the credentials that can be used to create the field.
Field Name - fcgraph (note this field can be named anything)
Description - Fluke Connect Graph
Type - Multi-Line Text (needs to be this field type for proper functionality)
Maximum # of Characters - 20

Once the field is created, click on the Wrench / Screwdriver icon next to the field. In the Field Properties under Behavior, select “Fluke Condition Monitoring” and then save the record.

Once the field has been created, it is time to configure the graph based on the type of data that is going to be trending. To setup the graph, go to the Asset record and click the “Edit” button. On the Fluke Connect Graph field, there will be a configure button that will be displayed to allow the user to create the graph.
Device Type - There are two options available:
Fc3540 - PowerMonitor: Allows users to trend data on the 3540 FC Three-Phase Power Monitor
Fc3000 - VATG - Allows users to trend data on either the 3510 AC Voltage Sensor, 3520 AC Current Sensor, or the 3530 Temperature Sensor.
Session Identifier - Allows user to trend the latest session started in Fluke Connect Condition Monitoring for that Asset or allows the user to pick an existing session.
Graph Type / Sensor - Allows the user to pick which sensor in the selected session to display trending data.
Data Type - Specifies the type of data to trend.
Channels Selected - Allows the user to select the channels of data to display on the graph.
Frequency - Defines the default time frequency the graph displays when accessing the asset record.
Refresh period (sec) - Defines how often the graph refreshes
Default View - Allows the user to setup the default graph type when accessing the asset record.

After the graph is configured, select “Apply Changes”. The graph will then display on the asset record.

The Fluke Connect Graphs can also be created on related tables for the Asset record. Below is an example of multiple graphs on a related table.

Trending Fluke Connect Condition Monitoring Data on Dashboards
The Fluke Connect Graphs can also be created on user dashboards. To create a Fluke Connect Graph on a dashboard, go to the Dashboard you would like to create the graph on and select “Add Widget”. Go to the “Miscellaneous” widget and select “Fluke Connect Feed”.
From here, configure the “Fluke Feed Properties” to define the graphs parameters.
Asset ID - The Asset record that the Fluke Connect Condition Monitoring equipment is connected to. Only the record that have the field “Fluke Connect Asset” set to true will display in the lookup.
Device Type - There are two options available:
Fc3540 - PowerMonitor: Allows users to trend data on the 3540 FC Three-Phase Power Monitor.
Fc3000 - VATG - Allows users to trend data on either the 3510 AC Voltage Sensor, 3520 AC Current Sensor, or the 3530 Temperature Sensor.
Session Identifier - Allows user to trend the latest session started in Fluke Connect Condition Monitoring for that Asset or allows the user to pick an existing session.
Graph Type / Sensor - Allows the user to pick which sensor in the selected session to display trending data.
Data Type - Specifies the type of data to trend.
Channels Selected - Allows the user to select the channels of data to display on the graph.
Frequency - Defines the default time frequency the graph displays when accessing the asset record.
Refresh period (sec) - Defines how often the graph refreshes.
Default View - Allows the user to setup the default graph type when accessing the asset record.

Once the graph is configured, click “Apply Changes” to display the graph.
Export Data Feeds from Fluke Connect in eMaint X4
On the eMaint Asset record, users have the ability to export the data feeds being stored in the Fluke Connect System. To export a data feed, go to the Asset in the eMaint system and in the Actions drop-down, select “Export Fluke Feed”.

- Select the session to export the data from.
- Choose the sensor from the session to export data.
- Pick a time interval to pull the data from.
This will allow the user to export the data in CSV format.
View Fluke Connect Notifications in eMaint X4
On the top of the screen, users have the ability to see the Fluke Connect Notifications in real time. There are three options a user can choose from in the Notification drop-down.
Alarms - Shows Alarms created in Fluke Connected based on readings exceeding a set threshold limit.
Connections - Displays information when Fluke Devices are either connecting or disconnecting from the Fluke Network.
All - Shows both Alarms and Connections in a single screen.
Work Order Generation from Alarms in Fluke Connect
In X4, Work Orders can be automatically generated from your predefined alarms in "Fluke Connect Condition Monitoring". In other words, when a reading is outside of the predefined boundaries for a sensor, a WO will be created in X4. The WO Type in these WOs will be FCCM and you will see more information about the issue that occurred in both the Brief Description and the Work Description fields.

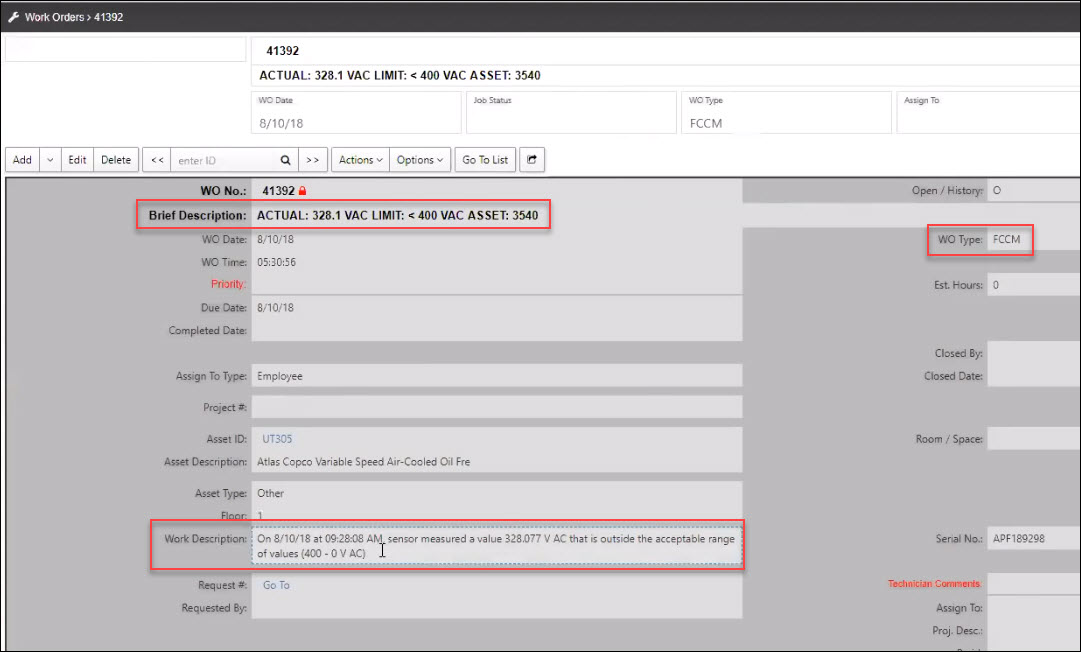
Note that this feature is not turned on by default. To turn it on, navigate to the Account Settings, then go into "External Interfaces" and turn on the option "Receive alarms from Fluke Connect".