The Asset File Information menu option will take you to the asset records or the equipment that you want to track in the system. Each asset record displays the meter readings associated with the asset, preventive maintenance schedules you have assigned to the equipment, the work order history associated with the equipment, the labor and parts charges that have been identified for the work orders associated with the equipment, and the Nameplate information you have entered for the equipment.
ListView
Click the Asset tab to display the Asset File Listing.
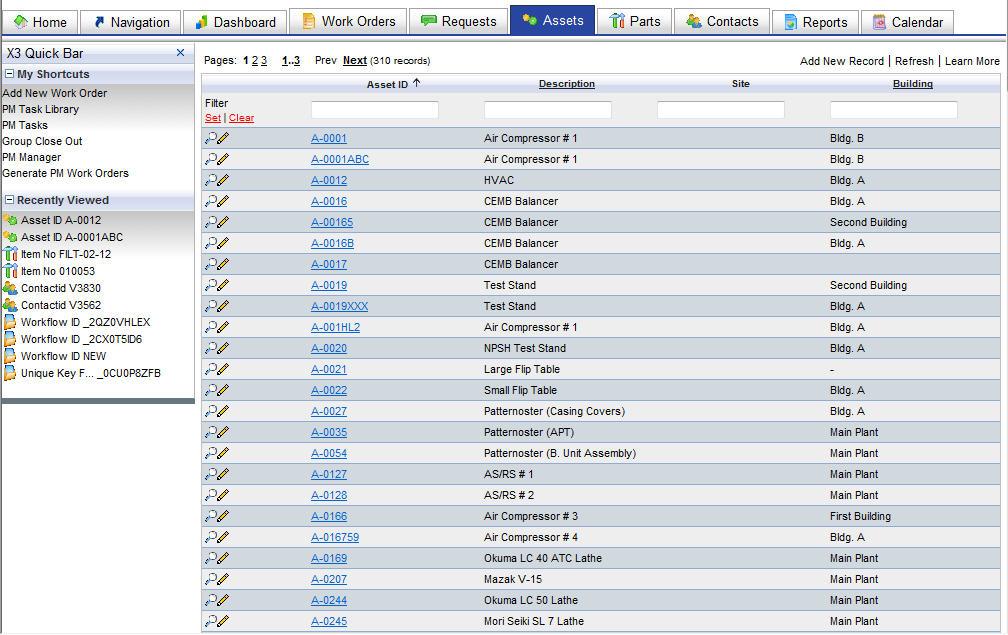
The assets are displayed in rows with column headers at the top of each row. Note that each asset displayed in the list has its AssetID underlined. This means you can click the Asset ID to see the asset record in detail. To the left of each row are two icons. The magnifying glass icon will open the detail record of the asset. The pencil icon will open the asset record in edit mode.
From this screen you can add a new asset record to the list by clickingAddNewRecord in the upper right corner. If any changes were made to an asset while this window was open, click Refresh to reload the page. The LearnMore link provides a brief description of the list view and how to navigate around it. To close the window and return to the main menu, click the CloseWindow link in the upper right corner.
Click the FormOptions link at the bottom of the list to change the default settings of how this screen is displayed.
SearchingyourAssets
You can expand your search further by applying sorts and/or filters.
Sortingthelist
Click on one of the column headings and the list will sort in ascending order. Once sorted, a small arrow icon (pointing up) will appear to the right of the column name. This indicates that the list is sorted in ascending order. Click the arrow icon and the list will sort again, this time in descending order.
ApplyingFilterstotheList
Filters are used to search the whole list and display the matching results. For example, if you wanted to see only the assets with a department that begins with the letter S, you would type the letter S in the filter for the Department column and then click the red Set link to the left of the filter row. Besides displaying the results, the number of records that matched the filter expression will display in the upper left of the screen. You can apply single or multiple filters at one time if needed.
To remove the filters, click the red Clear link and click Set again. The full list will display.
TIP: The system remembers the filters and sorts that you apply and will display it the next time you navigate to that list.
DetailView
To view the detail record of a particular asset, either click on the underlined Asset ID in the list or on the magnifying glass icon to the left of the asset on the list. The detail record of that asset will display on screen (example below).
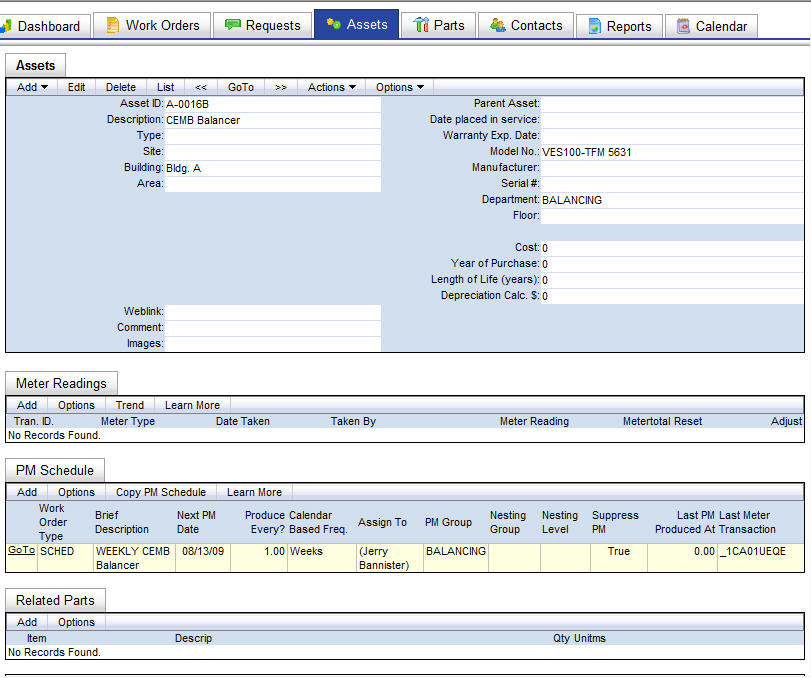
The detailed information about the asset is shown in the top portion of the screen. These are the basic fields that are used to describe an asset.
NOTE:WitheMaintX3, youhavetheabilitytoaddadditionalfieldstothedetailscreen (orremovethem), changefieldnamesandattributes, changethescreenlayout, changecolors, etc.
The additional sections of the asset detail screen are Meter Readings (entering meters), PM Schedules, Related Parts (associating parts with the asset), and Nameplate Information.
The additional options available for the asset detail include:
Add – Opens a blank record for entering a new asset.
Copy/Add – Opens a new record in Add mode and populates the form with the previous record's values.
Edit – Opens the record in Edit mode for changing the asset's information.
Delete – Marks the record for deletion and removes it from the list view.
List – Returns to the list view.
<< – Displays the detail of the previous record (ordered by ID).
>> – Displays the detail of the next record (ordered by ID).
GoTo – Opens a window that allows you to navigate directly to a record by entering the Asset ID.
Actions – Allows you to choose from the different actions you can perform.
Charges – Displays all the charges made against the asset in a window directly below the detail view.
History – Displays work order history of the asset directly below the detail view.
KeyChange – Allows you to change the key field of the part.
PartsCharge – Allows you charge parts against the asset without an existing work order (if enabled).
LaborCharge – Allows you to charge labor against the labor without an existing work order (if enabled).
Options – Options can include LearnMore, ChangeForm, CustomizeForm, and ManageRelatedTables.
AddingAssets
You can add new assets from either the list or detail view. From the list view, the AddNewRecord link is directly above the field headers and will open a new window in add mode. From the detail view, theAdd choice is the first in the main menu bar and will change the current window to add mode. The Copy/Add option also changes the current window to add mode, except it will populate the form with the previous record's values for fast record entry.
The key field for assets is AssetID and must be entered before SaveNewRecord is pressed. However, you should enter as much information as you can to differentiate the asset from others. Click SaveNewRecord to save the new asset. CancelChanges will discard the new asset information.
EditingAssets
The form for editing asset information can also be accessed from either the list or detail views. From the list, click the pencil icon. From the detail view, click the Edit link in the menu bar. Both links will open the edit form in the existing window.
The Edit form is similar to the Add form, except that the key field cannot be edited. The key field is the unique identifier for the part and can only be changed using theKeyChange option.
Click SaveChangesto save the changes or CancelChangesto discard them. The form will return to the detail view of the asset.
EditingInPlace
If EditInPlace is enabled, you can make changes to most fields without the need for entering edit mode. Enter the record's detail screen by clicking on the Magnifying Glass icon or the Asset ID link on the list view. Place your mouse cursor over the field you wish to edit. If the field is able to be edited, the cursor will change to a  . Double-click your left mouse button and the field will open in edit mode. Make your changes then click the save
  icon to save your changes or click the cancel icon
  to return without saving.
If a field cannot be edited with Edit In Place, the cursor will change to a no symbol  . If editable, these fields require you to enter Edit mode to make any adjustments.
DeletingAssets
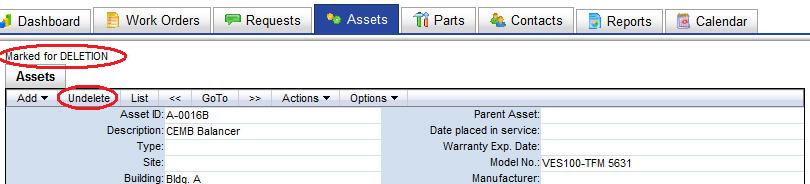
Deleting records is a two step process. The first step is to mark the record for deletion by clicking the Deletelink. This removes the record from the list view but still allows you to locate it by using the GoTolink (if you know the record's ID) or using the Next and Previous links to page through the records. At this point, you can still un-delete the record by clicking the Undeletelink.
The second step of the deletion process is to completely remove the records from the system. Go to the Remove Deleted Records link located in the Administration menu. This list displays the various tables that can hold records marked for deletion. Click the magnifying glass icon to preview items that will be deleted. Click the trash can icon to remove all the records for that section.
NOTE:TheRemoveDeletedItemsoptionpermanentlyremovesrecords. Thereisnowaytobringthemback. Usethisfeatureatyourownrisk.
Charges
Clicking this option will display the charges (labor, parts, misc., etc.) made to work orders that are associated with this asset. A date filter is provided to view a specific period of time.
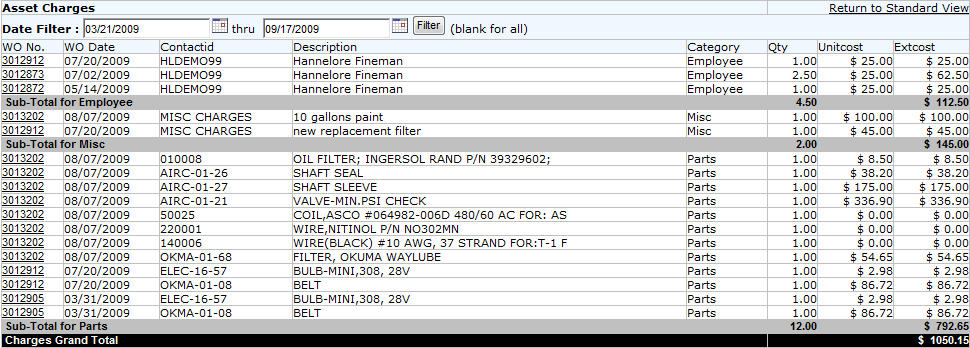
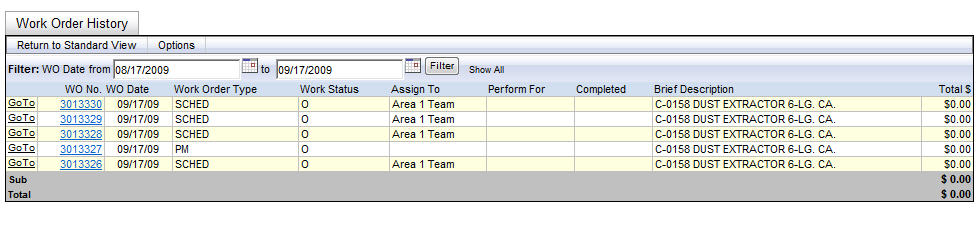
TIP: Notice that the work order numbers are underlined on the display for both the History and Charges. This means you can click on the number and that work order record will display in a new window to view it in more detail.
History
Clicking this option will display a listing of the work order history for the asset in the bottom portion of the screen. A date filter is provided to view a specific period of time.
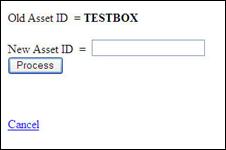
KeyChange
Since key fields are not able to be changed in edit mode, the KeyChange link has been provided to safely change the key field without corrupting the record.
Clicking KeyChangewill open the key change form. Enter the new number in the field provided and click Process. This will display a summary of adjustments made to the table and verify the change is complete.
Click the GoBackwithoutmakingchangesto return to the part without changing the key field.
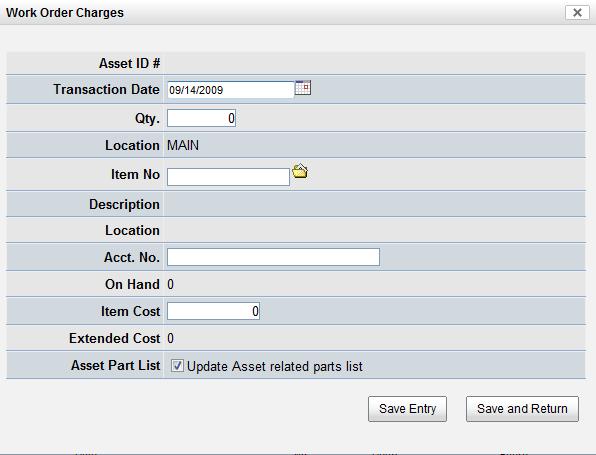
PartsCharge
In the Inventory Control Settings section of ChangeYourSettings, there is an option to Allowdirectpartchargestoasset which will allow you to create charges on an asset without going through the normal charge process on the work order. When this option is set to yes, you will have an additional function available on the Asset detail screen called PartsCharge, which will be in the Actions menu. When you click this link, a part charge screen will show as below.
Enter the information in the text boxes provided. Fields without text boxes are populated automatically from other fields. For example, entering the Qty (quantity) and ItemCost fields will calculate the value for ExtendedCost.
If the part being charged isn't on the Related Parts table, click the UpdateAssetrelatedpartslist checkbox on the AssetPartListfield to add this part to the list upon saving the form.
After you enter the information for the charge, click SaveandReturn to save the form and return to the Asset detail screen, or SaveEntry to save and continue adding charges . Any success or error messages will appear in the lower left-hand corner of the form.
The system will then create a blanket work order for the asset with a status of K that containsPartsChargeWorkOrderin the Brief Description field to separate it from regular work orders. If a blanket work order exists from a previous transaction, the charge will be added to the existing work order by adding a line in the Charges table.
NOTE:Onlyusethisoptionifyouhavenointentionoftrackingyourmaintenanceworkonyourassetsbutdowishtotrackpartscostsforanasset. Chargingoutpartstoaworkorderperformedonanassetisthebestwayoftrackingpartsbecauseofthecompleteinformationitprovidesaboutthetypeofwork, lengthofwork, andotherkeytrackingitemsinvolvedinthecreationofworkorders.
LaborCharge
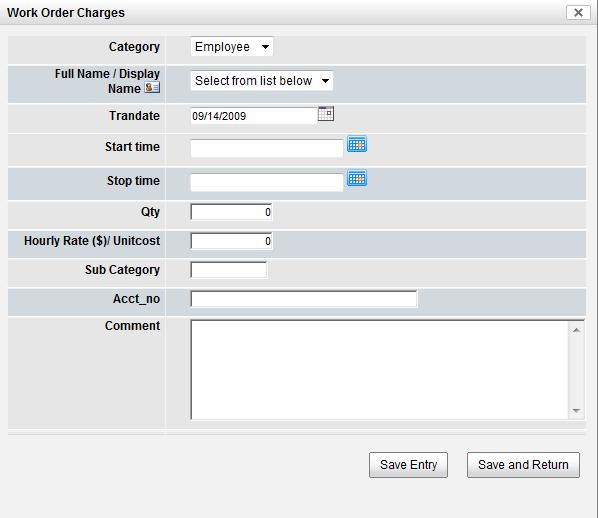
In the General System Settings section of ChangeYourSettings, there is an option to AllowDirectLaborChargestoAssets which will allow you to create labor charges on an asset without going through the normal charge process on the work order. When this option is set to yes, you will have an additional function available on the Asset detail screen called LaborCharge, which will be in the Actions menu. When you click this link, a labor charge screen will show as below.
Enter the information in the text boxes provided. Click SaveandReturn to save the form and return to the Asset detail screen. Click SaveEntry to save the form and continue to add more labor charges to this asset.
The system will create a blanket work order for the asset with a status of K. If a blanket work order exists from a previous transaction, the charge will be added to the existing work order by adding a line in the Chargestable.