The Workflow Manager allows you to configure your system to react to certain events. A workflow operates like cause and effect. For example, you create a rule that when a user marks the 'Work Order Type' as “Emergency” and saves the form (cause), the system reacts by changing the 'Assign To' field to a specific contact (effect).
The WorkflowManager is accessed in the Administration section of theNavigation Tab.
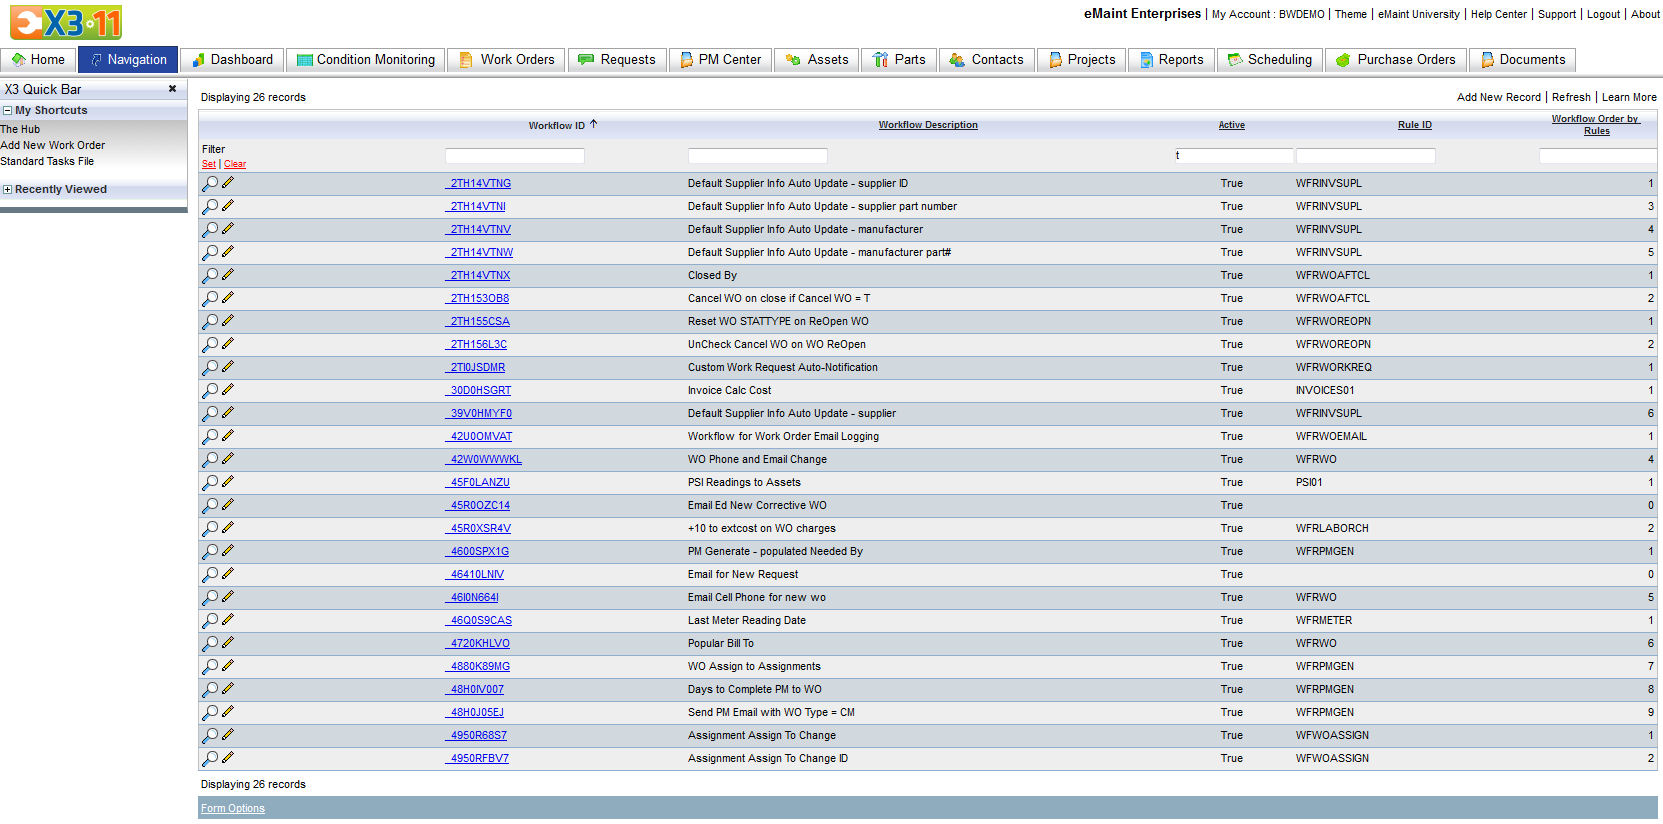
The Workflow File Listing displays all of your workflows in a list view. When you enter this section for the first time there be a few workflows that come with eMaint by default. Click theAddNewRecord link to add a new workflow
AddingaNewWorkflow
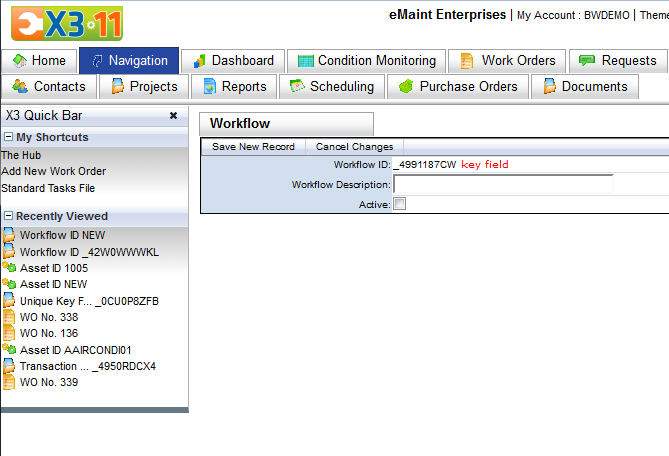
The blank workflow screen contains only three fields:
- Workflow ID – This is the keyfield for the workflow. This field is populated automatically and cannot be changed by the user.
- Workflow Description – Use this field to describe the what the workflow does.
- Active – This switch activates and deactivates the workflow. This is a convenient feature for disabling a complex workflow without having to delete it.
When you have completed this form, click SaveNewRecord. Your new workflow will be saved and reloaded in Detail view.
ConfiguringaWorkflow
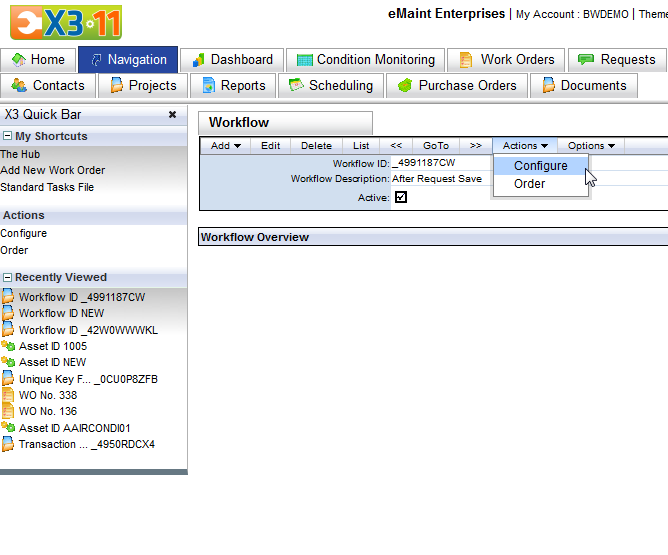
After you have created a workflow, configure it by hovering over the “Action” button in the detail view of the workflow and clicking theConfigure option.
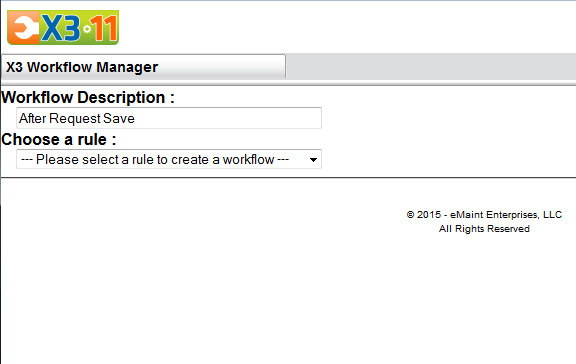
You will be presented with the X3 Workflow Manager. Begin configuring your workflow by choosing a rule in the 'Choose a rule' drop-down box. Below the image you will see a few examples of the options you can choose from:
- AfterAssetDocumentSave
- AfterInvoiceSave
- AfterKitItemSave
- AfterPMDocumentSave
- AfterTaskProcedureSave
- AfterWorkOrderDocumentSave
- AfterWorkOrderSave
- BeforeWOisclosed
- AfterWOisclosed
- AfterWorkOrderisReopened
- AfterWOPrint
- AfterPMGeneration
- AfterWOProcedureSave
- AfterWorkOrderAssignment
- AfterWorkRequestSave
- AfterLaborChargeSave
- AfterPartsChargeSave
- AfterPartReturnSave
- AfterMiscChargeSave
- AfterAssetSave
- AfterAssetPartSave
- AfterAssetNameplateSave
- AfterMeterSave
- AfterPMSave
- AfterPMPartSave
- AfterTasksSave
- AfterPartsSave
- AfterPartSupplierSave
- AfterPartLocationSave
- AfterPartAdjustment
- AfterInventoryLocationAdd
- AfterPurchaseOrderLineSave
- AfterTimecardSignon
- AfterTimecardMoreworktodo
- AfterTimecardCompleted
- AfterStockRequisitionSave
- AfterRequisitionSave
- AfterContactSave
- AfterPMProcedureSave
- BeforeQuickPartsAddCharge
- BeforePartsAddCharge
- BeforeLaborAddCharge
- BeforeMiscAddCharge
- BeforeOtherEditCharge
- BeforePartsEditCharge
- BeforeLaborEditCharge
- BeforeMiscEditCharge
- AfterPurchaseOrderReceipt
- AfterPurchaseOrderLineisclosed
- AfterProjectSave
- AfterWorkOrderEmail
- AfterMonitorReadingSave
Note:AsweenhancetheWorkflowManager, optionsmaybeaddedorremoved. Theoptionslistedheremaybedifferentthanthelistonyouraccount.
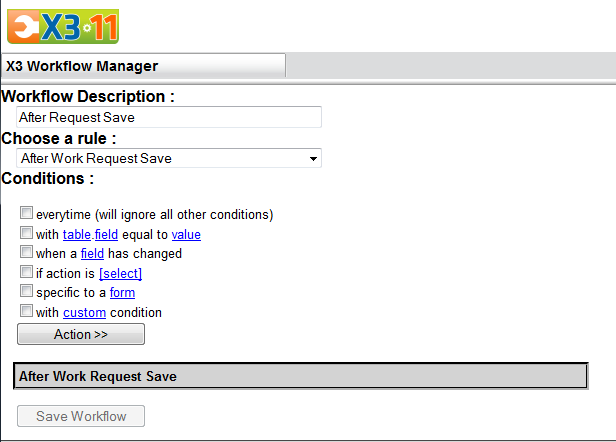
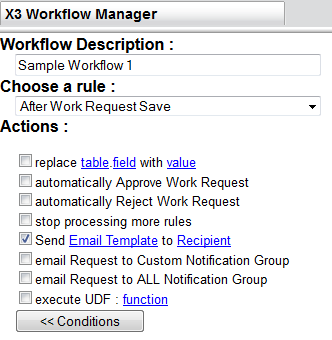
Your choice will open the rest of the Workflow Configuration page. The upper portion contains the options for Conditions and Actions and a button that switches between the two. The lower portion with the gray background will display your choices as you make them and allow you to configure them using the links provided.
Conditions need to be in place and configured before the system can perform an Action. The options for conditions are:
- everytime (willignoreallotherconditions) - This workflow will always trigger as long as the rule being used is correct.
- withtable.fieldequaltovalue – Place a check in this box to select a field that appears on the form and the value that will activate the workflow.
- whenafieldhaschanged - Allows workflow to trigger when a field value changed from the last save.
- ifactionis[select] - Determine if workflow triggers from a new record or an edit save.
- specifictoaform- Workflow only triggers if a specific form is being used.
- withcustomcondition – Place a check in this box to create your own filter and value.

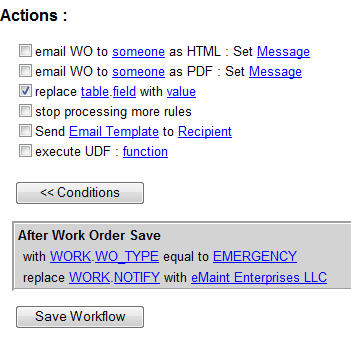
When you make your choice it will appear in the lower portion of the page. Next, click the Action button to display the available Actions. These options are:
- email WO to someone as HTML: Set Message - Will send an email to either a preset email address or based on the email address within the work order in HTML format.
- email WO to someone as PDF: Set Message - Will send an email to either a preset email address or based on the email address within the work order in PDF format.
- replace field with value – When the condition is met, the system will replace the field chosen here with the value you set.
- stop processing more rules - If the previous conditions are met, it will stop processing workflows that would normally activate after this workflow based on the order.
- Send Email Template to Recipient - Will send a custom Workflow Email Template to either a chosen email address or one based on a field in the table.
- Execute UDF (User Defined Function): function – This option is a support tool. If the workflow requires custom actions, the eMaint support department will place a value here.

Choose your desired Action to add it to the lower portion of the page, directly below the chosen Conditions.
You are now able to configure the Conditions and Actions. Click each link to open a window that contains the configuration options. When you complete the form, the link will be replaced with your choice.
When you have set all the options in the lower portion of the Workflow Manager, the SaveWorkflow button will become available. Click it to save your new workflow.
Below is a list of functions commonly used in UDF (User Defined Functions):
- ALLTRIM( ) Function - Removes non printable characters from the beginning and end of a string
- BETWEEN( ) Function - Used in the context of Between(VALUE, Lower boundary, Upper boundary) will return True or False
- CHR( ) Function - Returns a value as a character string
- CMONTH( ) Function - Returns the month in a character format
- DATE( ) Function - Returns current date
- DATETIME( ) Function - Returns the current date & time value
- DAY( ) Function - Returns the current day of month
- DOW( ) Function - Returns the day of the week
- DTOC( ) Function - Transforms a date value to a character string
- DTOT( ) Function - Transforms a value to a date & time format
- EMPTY( ) Function - Returns an empty value
- GOMONTH( ) Function - Returns the date that is a specified number of months before or after a given Date or Date Time value.
- HOUR( ) Function - Returns the hour as a numeric value.
- IIF( ) Function - Returns one of two objects, depending on the evaluation of an expression.
- INLIST( ) Function - Determines whether an value matches another value in a set of values.
- LOWER( ) Function - Returns a value in lower case
- LTRIM( ) Function - Trims all space or non printable characters to the left of a value
- MINUTE( ) Function - Returns a whole number between 0 and 59, representing the minute of the hour.
- MONTH( ) Function - Returns the month in numeric format
- RTRIM( ) Function - Trims all non printable characters to the right of a value
- TIME( ) Function - Returns the current time
- TTOC( ) Function - Transforms Date time value to a character
- TTOD( ) Function - Transforms Date time value to a date value
- UPPER( ) Function - Returns a value in all Upper Case
- VAL( ) Function - Returns a value as a numeric value
- WEEK( ) Function - Returns a numeric representation of the week in the year.
EditingaWorkflow
Changing a workflow is similar to adding a workflow. Locate your workflow in the List view and click it to enter the Detail view. If you are only changing the title of the workflow, click the Edit link to enter edit mode and make your changes, then click the SaveChanges link.
If you are changing the workflow rules itself, enter the Detail view as described above then click the Configure link. The Workflow Manager will open with the configured rules laid out for you.
You can make adjustments to the behavior of the workflow by clicking the links and reconfiguring them. You can also change the Conditions and Actions by adjusting the check marks in the checkboxes and clicking the links in the gray box to configure the new options.
Alternatively, you can completely alter the workflow by using the 'Choose a rule' drop-down list to select a new rule. The lower portion of page that contains the configurations of the workflow will be cleared out for the new workflow.
When you are finished, click the SaveWorkflow button to record the changes or click the GoBack link at the top right of the screen to return without saving.
DeletingaWorkflow
Locate the workflow in the List view and click the Workflow ID or the magnifying glass to enter the Detail View. Click the Delete link on the form. The workflow will be marked for deletion and unavailable in the list views. See the Remove Deleted Records document “LinkHere” to permanently remove the workflow from the system.
Note: Remember, youhavetheoptiontodisableaworkflowfromoperatingusingthe 'Active' field. Usethisinsteadofthedeletelinktosaveyourselfthetimeofre-enteringworkflows.
WorkflowEmailTemplates
In some cases, it's beneficial to make a customized email to be used with a workflow. A Workflow Email Template is a pre-defined email that a workflow will send out, based on the conditions that you set. First, go to the Navigation tab and look under the Administration section. Right under Workflow Manager, you'll find Workflow Email Templates. This will take you to a list of existing templates. Click Add New Record and you will see the following form.
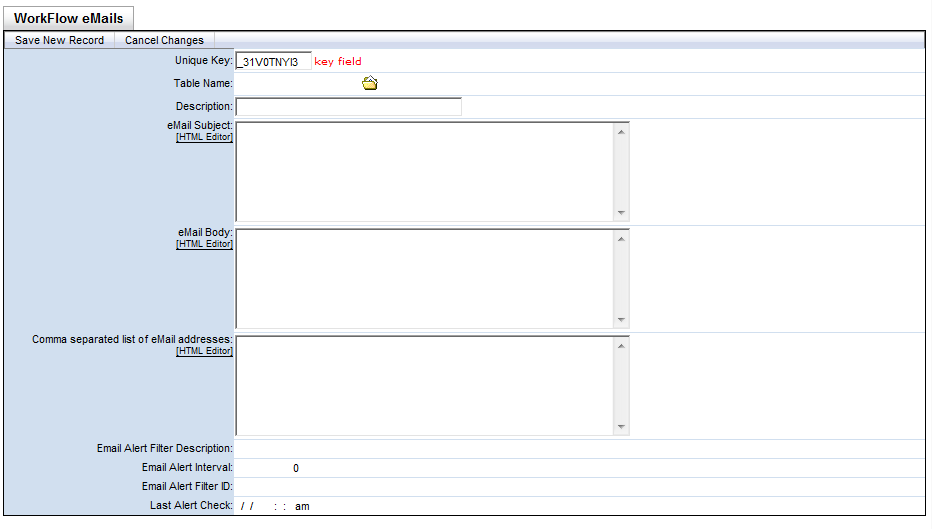
Some of the fields on this form include:
- Uniquekey: This is the key field, which the system will generate automatically.
- TableName: Choose the table to which the email applies.
- Description: Enter a name for this template, so you'll be able to easily identify it.
- eMailSubject: The text entered here will become the subject of the email that is sent.
- eMailBody: The text entered here will become the body of the email that is sent.
- CommaseparatedlistofeMailaddresses: Enter the default email address(es) for this email. Multiple email addresses should be separated with a comma and no space. (it is not necessary to specify email addresses here. You also have the option to specify them on the workflow itself).
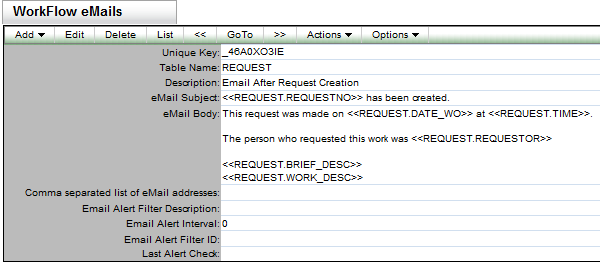
In the subject or body of the email, you can type whatever text you'd like to appear or you can reference fields from which you'd like the system to take information. To do this, start with 2 "less than" symbols (<<), type the name of the table from which the information is coming (WORK), type a period, type the system name of the field (ASSIGNTO), and close with 2 "greater than" symbols (>>). For example, if this email template is for work orders and we want to show the work order number in the email, we would enter something like this: "Work order number <<WORK.WO>> has been closed." Entering "<<" and ">>" tells the system that the text between these is referring to a field.
Once you have the email template set up, you are ready to create the workflow that is going to send this email out. On some workflow rules, you'll have an Action choice called "Send Email Template to Recipient." Choose that and it will appear in the gray box at the bottom.
In the gray box, click on the "Email Template" link and a window will appear that will allow you to choose the email template you've created, from a list that includes all of your email templates that are related to the workflow rule you've chosen. When you select the template, you'll see a preview of the email. Just click the Save button when you're finished.
Next, click on the link that says "Recipient." A screen will appear that will allow you to control from where the workflow will get its email address.
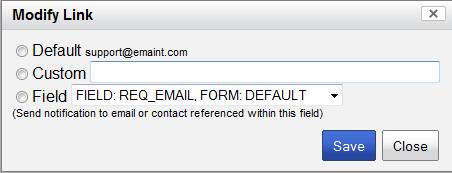
There are 3 options available:
- Default: Uses the email address entered on the template itself.
- Custom: Allows you to manually enter an email address.
- Field: Retrieves the email address from the contact record of the Assign To person, the Perform For person, or the Requester Email field. (only available for work orders)
When you've selected the option you want, just click the Save button and then you can save the workflow.
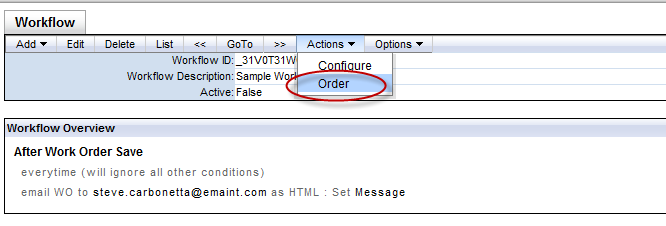
OrderingWorkflows
You may have several workflows that are using the same rule; After WO Save, for example. Sometimes, they will affect the same records and one workflow is dependent on another. When this is the case, it's best to set the order in which the workflows will be executed. To do this, go to a workflow that is already configured and click the Order option from the Actions menu.
You will see a screen like this:
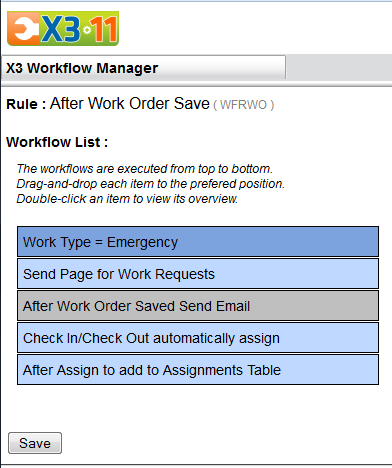
As you can see, the rule is displayed at the top on the screen and the different workflows that are based on this rule are shown below. Instructions are also given on this page. The top workflow will be processed first, and the bottom will be last. To change the order, simply drag and drop. Click Save when you're satisfied with the order.