There are two different kinds of work orders in the system, PM and non-PM work orders. These two types have a slightly different Close Out form.
To close a work order, open a work order's detail view and click Close Out under the Actions dropdown.
Non-PM Close Out
The non-PM close out screen has two sections: Work Order Close Out and Close out fields . A third section, Meter Options , will appear if the asset has a meter-based PM.
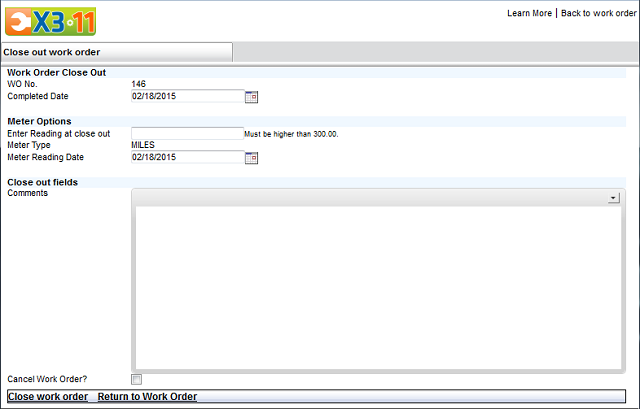
Work Order Close Out Section
This section allows you to change the completion date. By default, the Completed Date is automatically populated with today's date.
Meter Options (only appears if the Asset records a meter)
The Meter Options section gives you the opportunity to enter a new meter reading when you close the work order. If the meter is a Running type meter, the Meter Reading at Closeout field will display the last meter recorded for the asset. This will help you with your entry, as Running type meters can only increase. If the meter is a Totals meter, there will be no message.
If the asset has multiple meters, you will have the opportunity to pick which meter type is being entered from a drop-down list. If no number is entered here, the system will simply close the work order without adding a meter reading.
Close Out Fields
The fields in this section are determined by the system administrator. These fields will appear on all work order types. Here is the link that shows you how to add fields to your close out form "Insert Document Link Here".
When you click the Close work order link, the work order form will be updated with the information entered on the Close Out form. In addition, the Status field will be changed from an O (open) to an H (history/closed).
Non-PM work orders can be reopened by clicking the Close Out link and then selecting the Reopen work order link at the bottom of the screen. This function can be turned off by the administrator.
Close out information can be viewed at any time by clicking the Close Out link from the work order detail.
PM Close Out
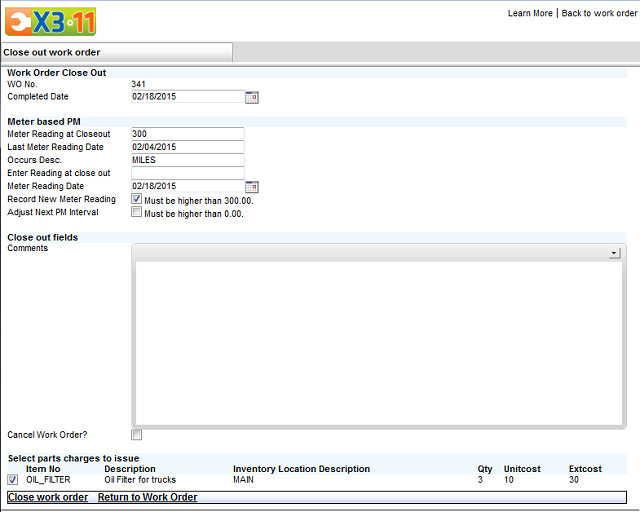
The PM close out screen is divided into 4 sections: Work Order Close Out , Calendar based PM , Meter based PM , and Close out fields . A fifth section, Select parts charges to issue , is available if the PM Schedule has items in the PM Parts table.
Calendar based PM (only appears if the PM is calendar-based)
The calendar frequency of the PM will be listed here. The Next PM Date is shown with the options to select a new date if you wish to change it (not available on Shadow type PMs).
Meter based PM (only appears if the PM is meter-based)
You may enter a new meter reading for this piece of machinery and/or adjust the next PM interval based on the new reading.

Here are three examples that explain the options available for meter based PM's at close out.
1) You have completed the PM work and simply want to record a new meter reading.
- Leave the box Record a New Meter Reading checked and enter the new reading in the Enter Reading at close out field.
- If the PM is a Running type meter, both check boxes will indicate what the entry must be greater than. This value is the last meter reading that was entered on this asset
Result : The Last Meter Reading Entry field on the PM Schedule is updated.
2) You have completed the PM work and want to enter a new reading but the meter has advanced to such a point that you need to have the next PM schedule based off of the new reading instead of the reading when the PM was generated.
- Place a check in both boxes.
- If the meter is a Running type meter, the meter entry must be greater than the Record a New Meter Reading value.
Result : The Last PM Produced at and Last Meter Reading Entry fields on the PM Schedule are updated.
3) You have completed the PM work but the meter has advanced to such a point that you need to have the next PM schedule generate from the new number at which the work was completed. However, your system automatically enters meters on your assets and you do not want to add a new reading.
- Check the Adjust Next PM Interval box and deselect the Record a New Meter Reading box.
Result : The Last PM Produced at field on schedule is updated.
The picture and the examples above refer to a running meter, but the option is available for totals as well. The same fields on the PM schedule will be updated but you will not see the Must be higher than X values on the Close Out screen.
Select parts charges to issue (only appears if PM has PM Parts assigned)
The bottom section called Select parts charges to issue shows PM Parts which were set with an Auto Issue Qty. These may be deselected; but if checked, they will be issued upon close.
Note: PM work orders can NOT be reopened once closed. Please be sure that the information you enter upon close is correct because you will not be able to change the close out information after the close.