An asset's meter can be entered many different ways: Manually through the “Meter Readings” table, through an import, through MX Mobile, manually through the Meter Manager, manually on the close out screen or via Email. These document will mainly explain the basic manual method.
To enter a meter reading manually you will need to go to the “Meter Readings” table located under the asset form. When closing a work order for an asset with a configured meter PM, you will also have the option to enter a meter reading.

Before making a meter entry, the asset must have a metered PM Schedule in place. This activates the meter on the asset and allows it to accept readings.
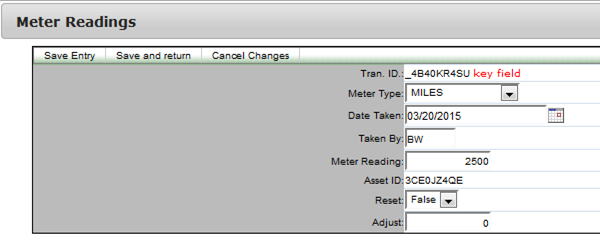
To add a meter reading on the asset form, click the Add link on the top-left corner of the Meter Reading related table and complete the form:
- MeterType – This is the type of meter being entered. The option entered here must match a PM Schedule configured for the asset; otherwise the reading will be immediately deleted.
- DateTaken – The date the meter reading was recorded. Default value is the current date.
- TakenBy – The user who recorded the meter reading.
- MeterReading – The meter reading value.
- AssetID – The associated equipment's Asset ID (automatically populated).
Reset and Adjust fields are only needed if the meter counter needs to be reset. The Adjust value is the amount of meter units that occurred between the last meter reading and the point that the meter was reset. On the PM Schedule, the current Meter Reading will be displayed based on the meter reading value entered.
An asset may also have multiple PM schedules which are based on different meter types. As the different types of meters are entered, the reading entries will be separated according to their type in the Meter Reading section of the asset.